
Campaign Scheduling
This document describes the different scheduling options that are available within Cheetah Digital for the three different supported Campaign types:
-
Regular One-off Campaigns,
-
Date-triggered Campaigns
-
Event-triggered Campaigns
Note: This document covers only the Enhanced Workflow Campaign screen within Cheetah Digital. The document does not cover the scheduling options available in the classic Campaign screen.
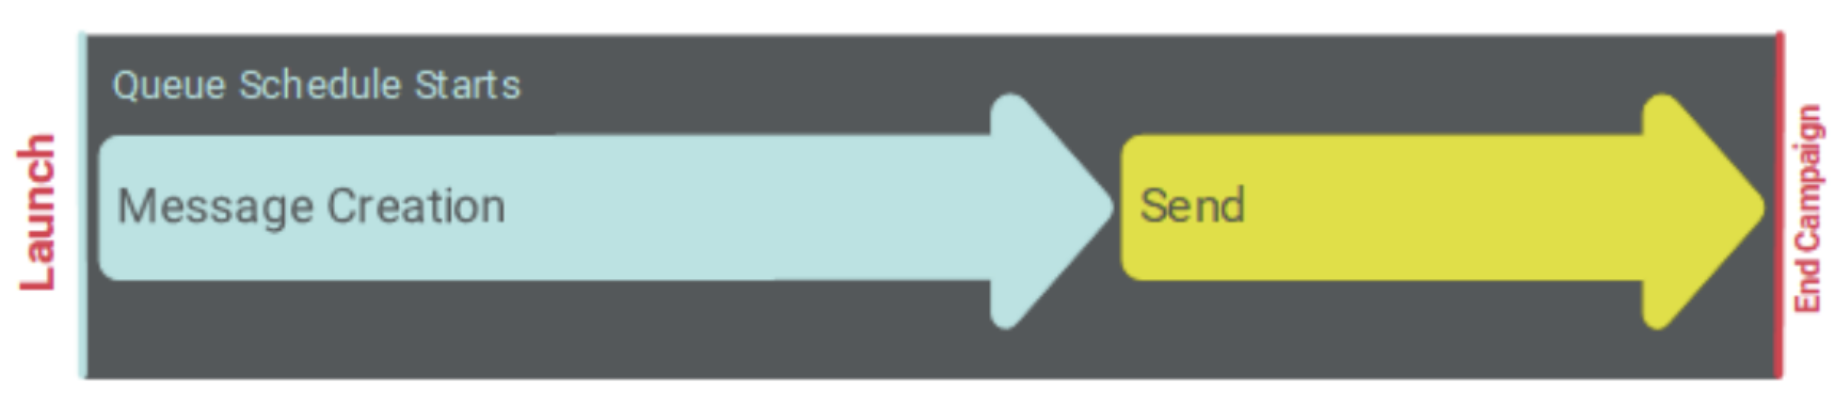
Launch phases
When a Campaign is launched, it goes through two separate and distinct phases: building messages and sending messages.
In the message building phase, the platform identifies the intended recipients of the Campaign, identifies all the possible content variations based on the Dynamic Content options used in the Campaign, and determines the Personalization values based on any
Personalization fields used in the content. The steps in this first phase are often collectively referred to as the queue process.
In the message sending phase, the system merges together the data and the content in order to assemble the final messages. These messages are then transmitted to the recipients.
Within a Campaign, each of these phases can be controlled by its own dedicated schedule that defines when to start the schedule for that phase, and (for triggered Campaigns) how often to execute the process.
Note: This document mostly focuses on the options available in the Email Channel. Depending on the Channel being utilized, not all of the Campaign scheduling options described within this document are supported.
Regular one-off Campaigns
Schedule options
Unlike triggered Campaigns, which potentially execute multiple times (i.e., when they're triggered), a Regular One-off Campaign builds and deploys messages only once.
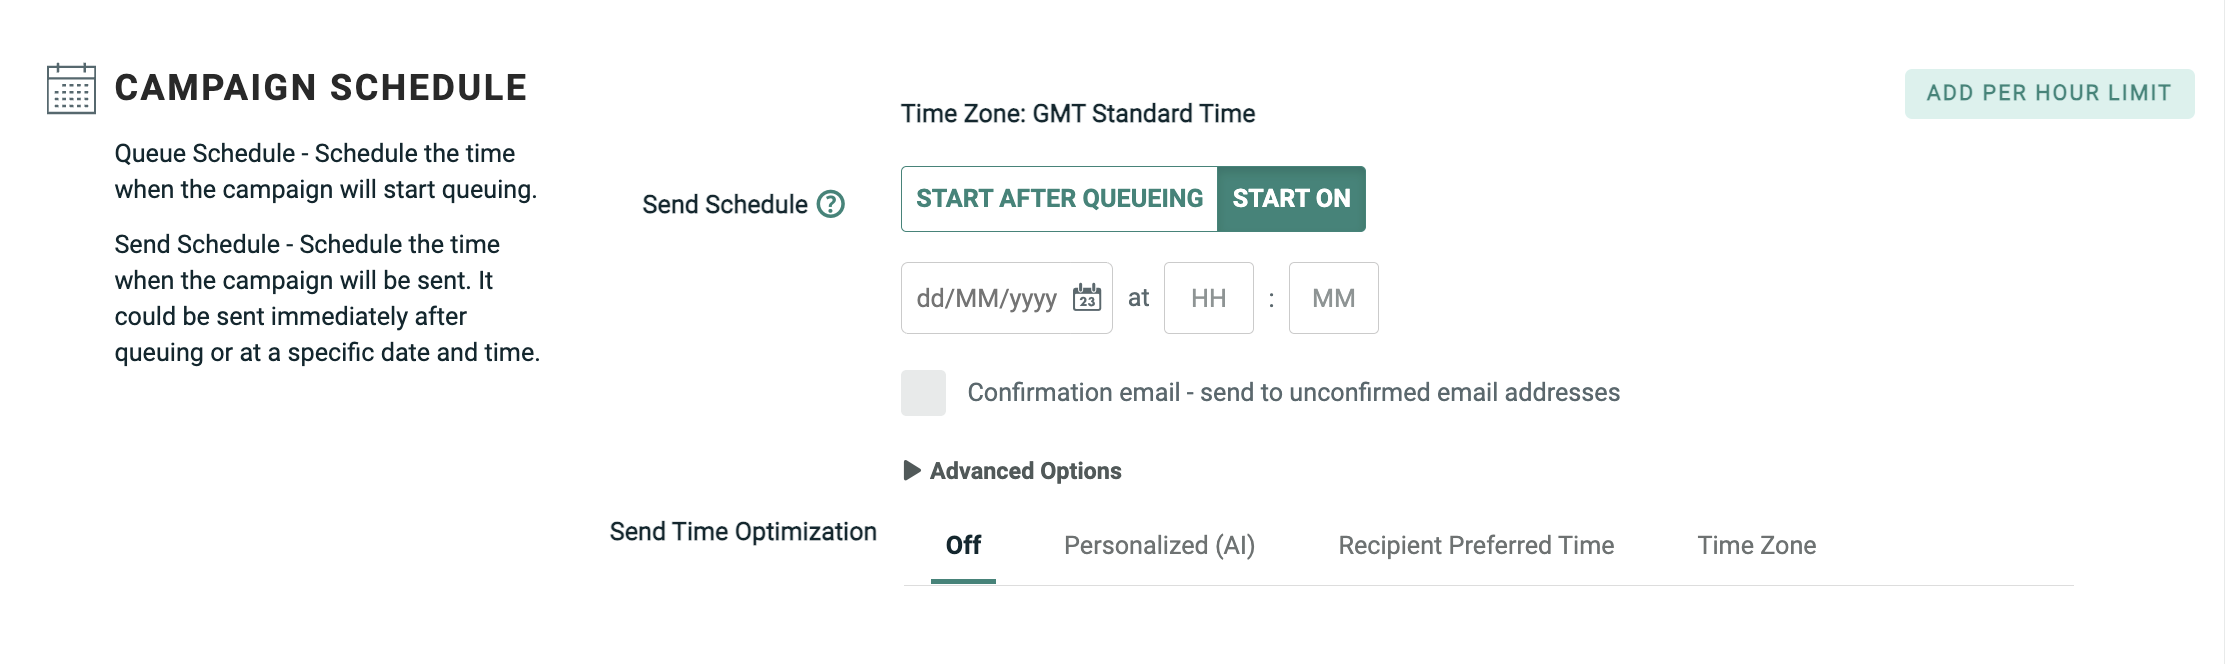
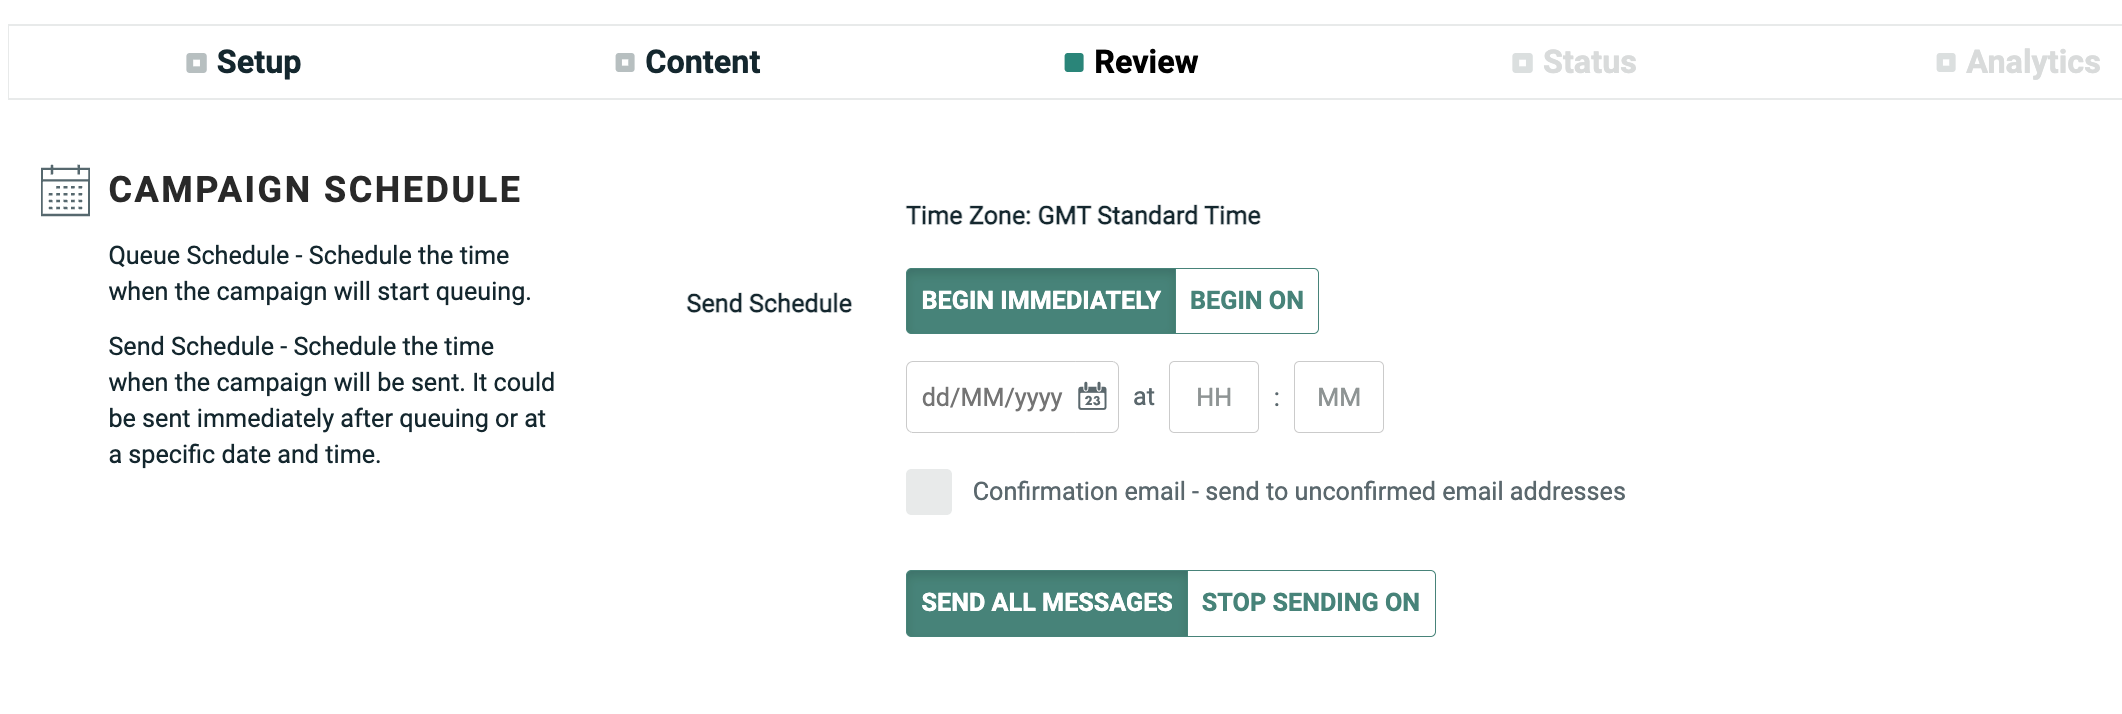
The schedule for a Regular One-off Campaign comprises the following components:
-
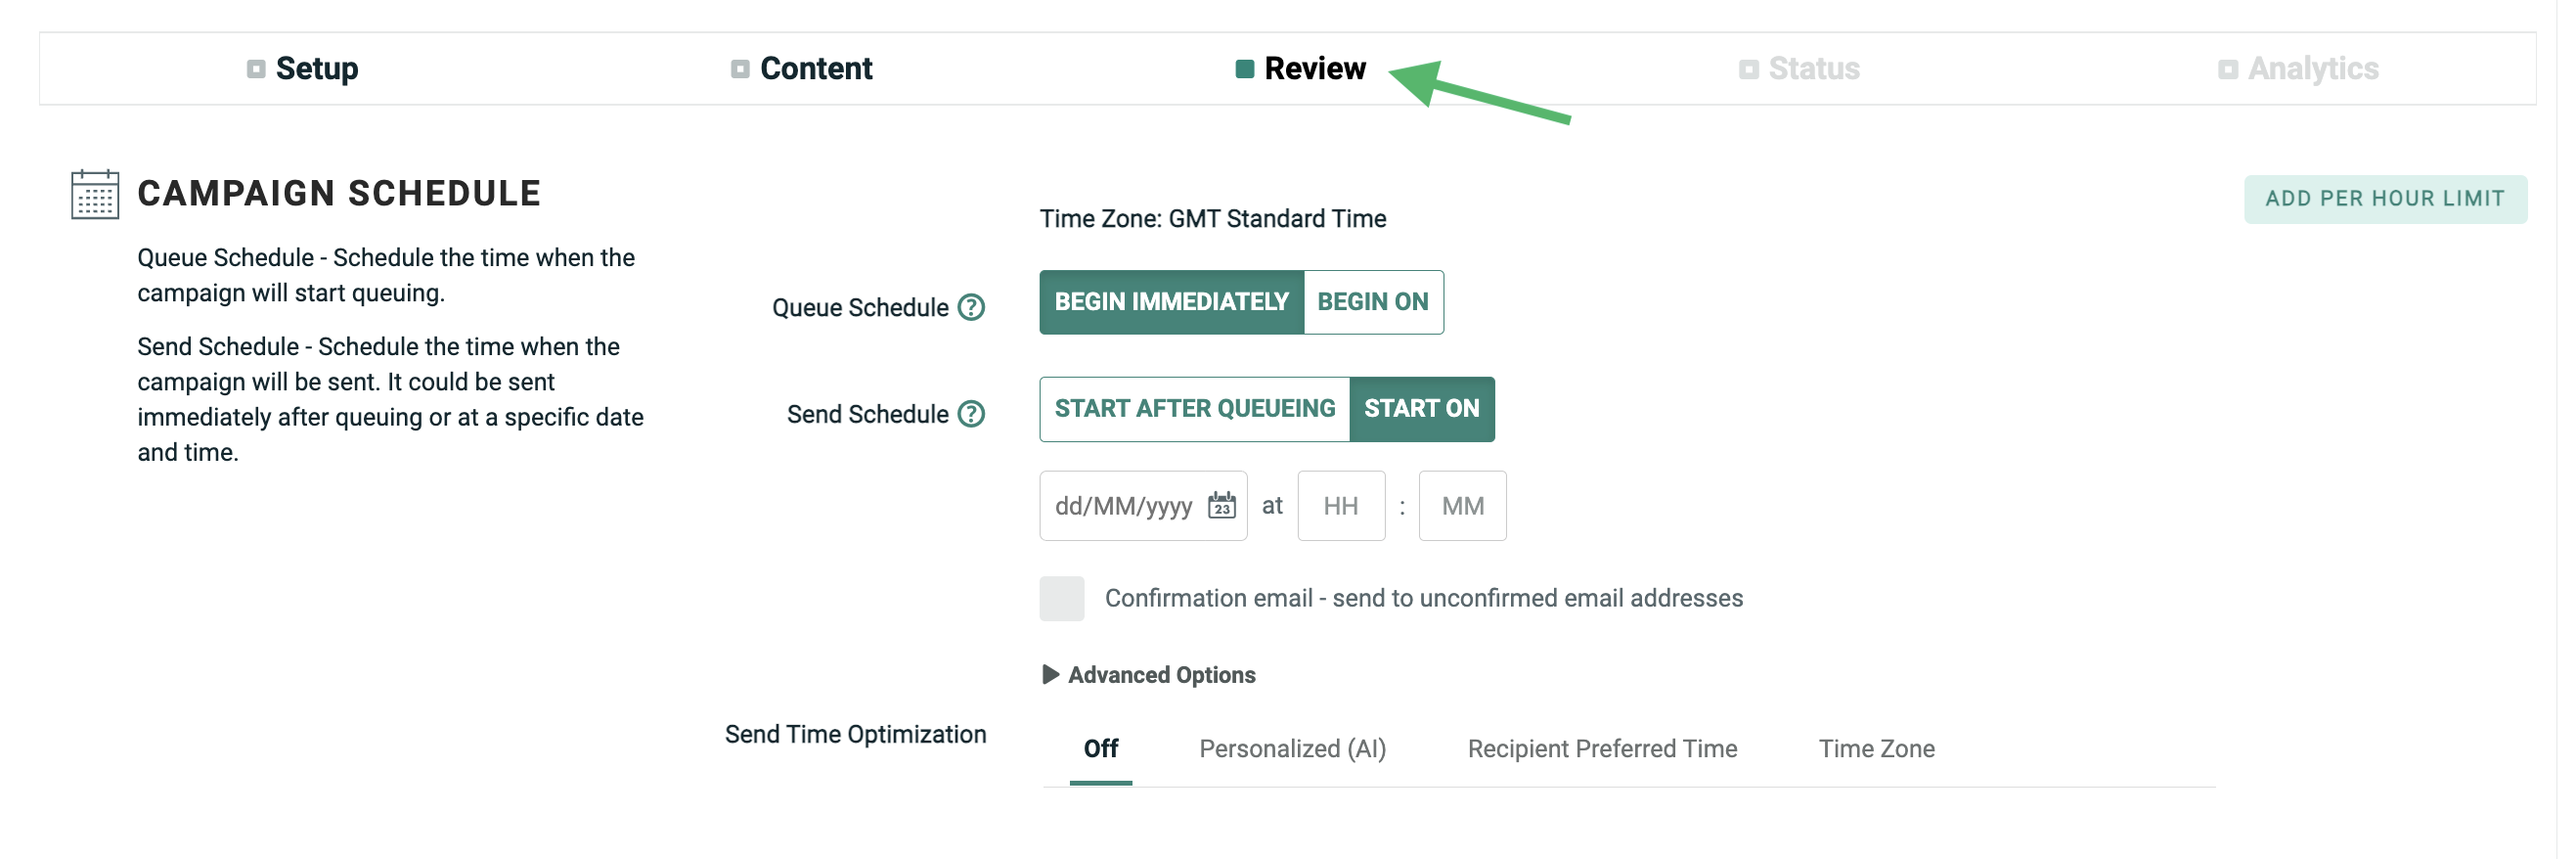
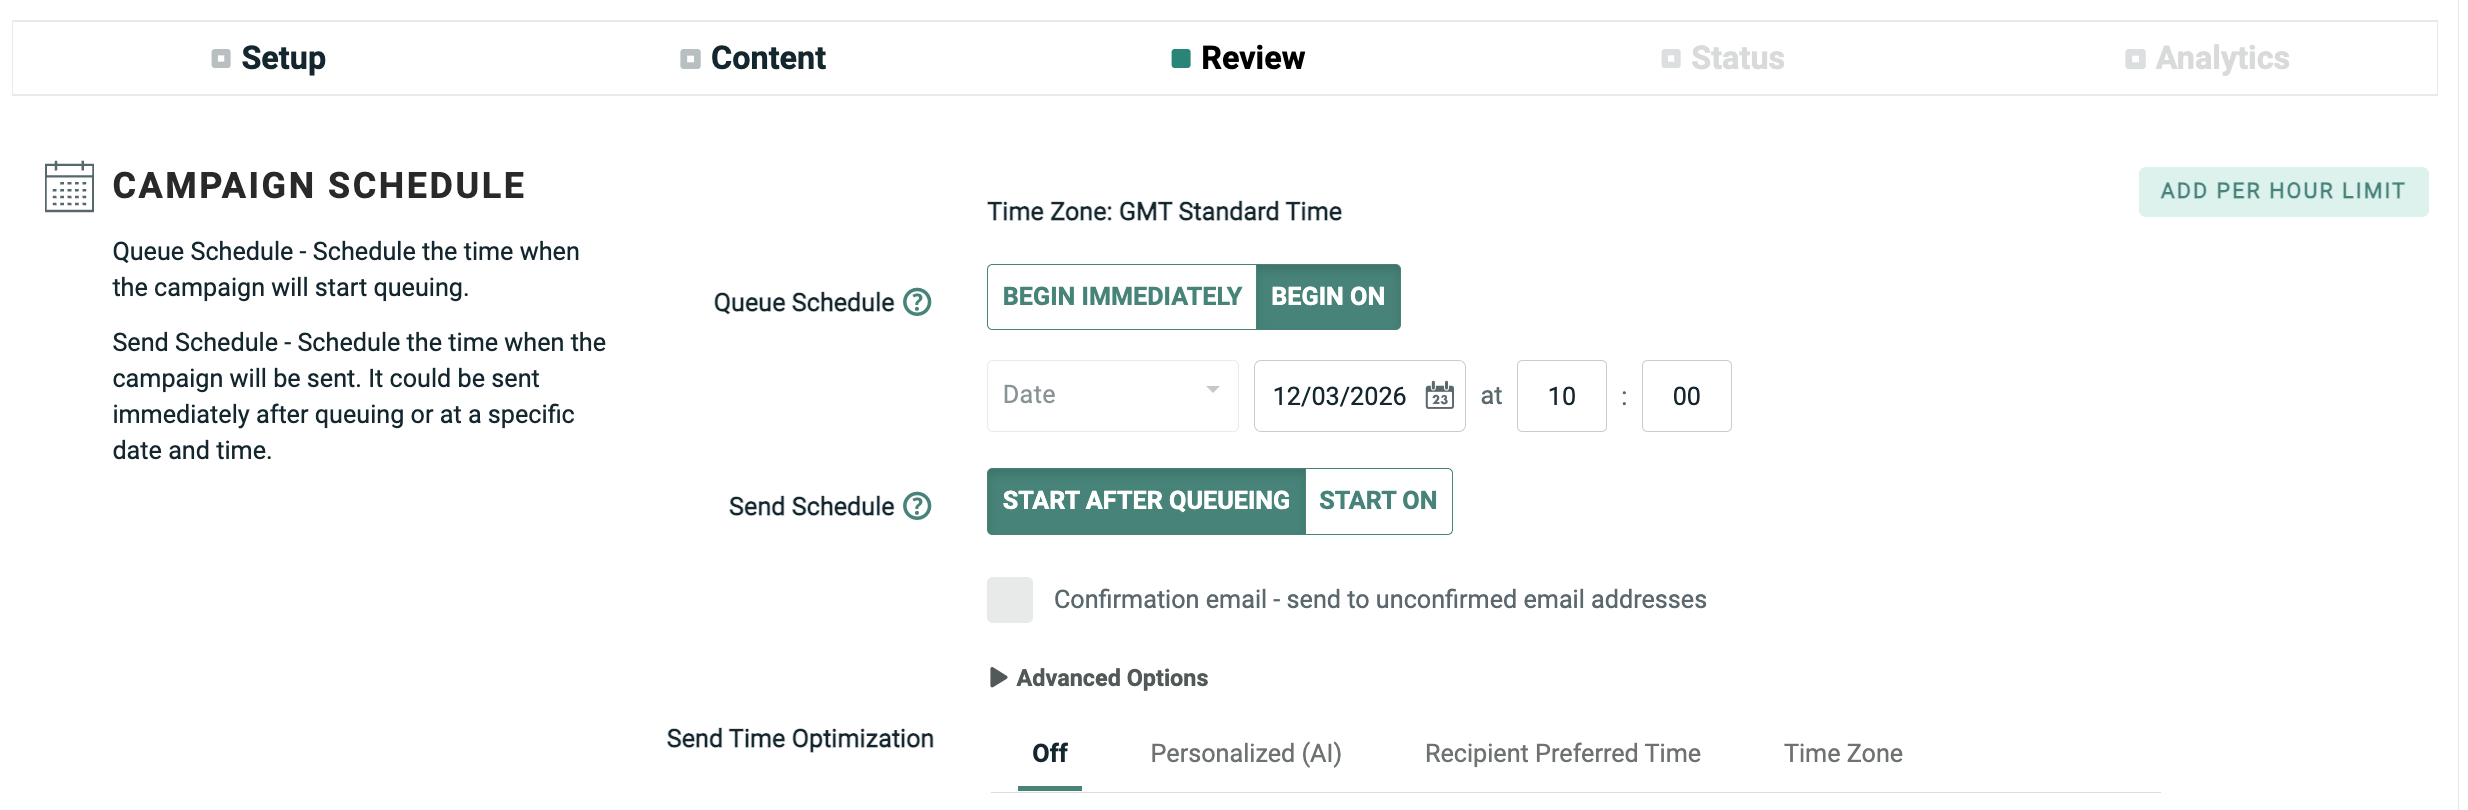
Queue Schedule Start: This component controls when you want the message building phase to begin. You can either select "Immediately," meaning the Queue Schedule will go live immediately after the Campaign is launched, or you can set a start date / time in the future. You can also derive a start date / time by working backwards from a defined Send Schedule start date / time.
-
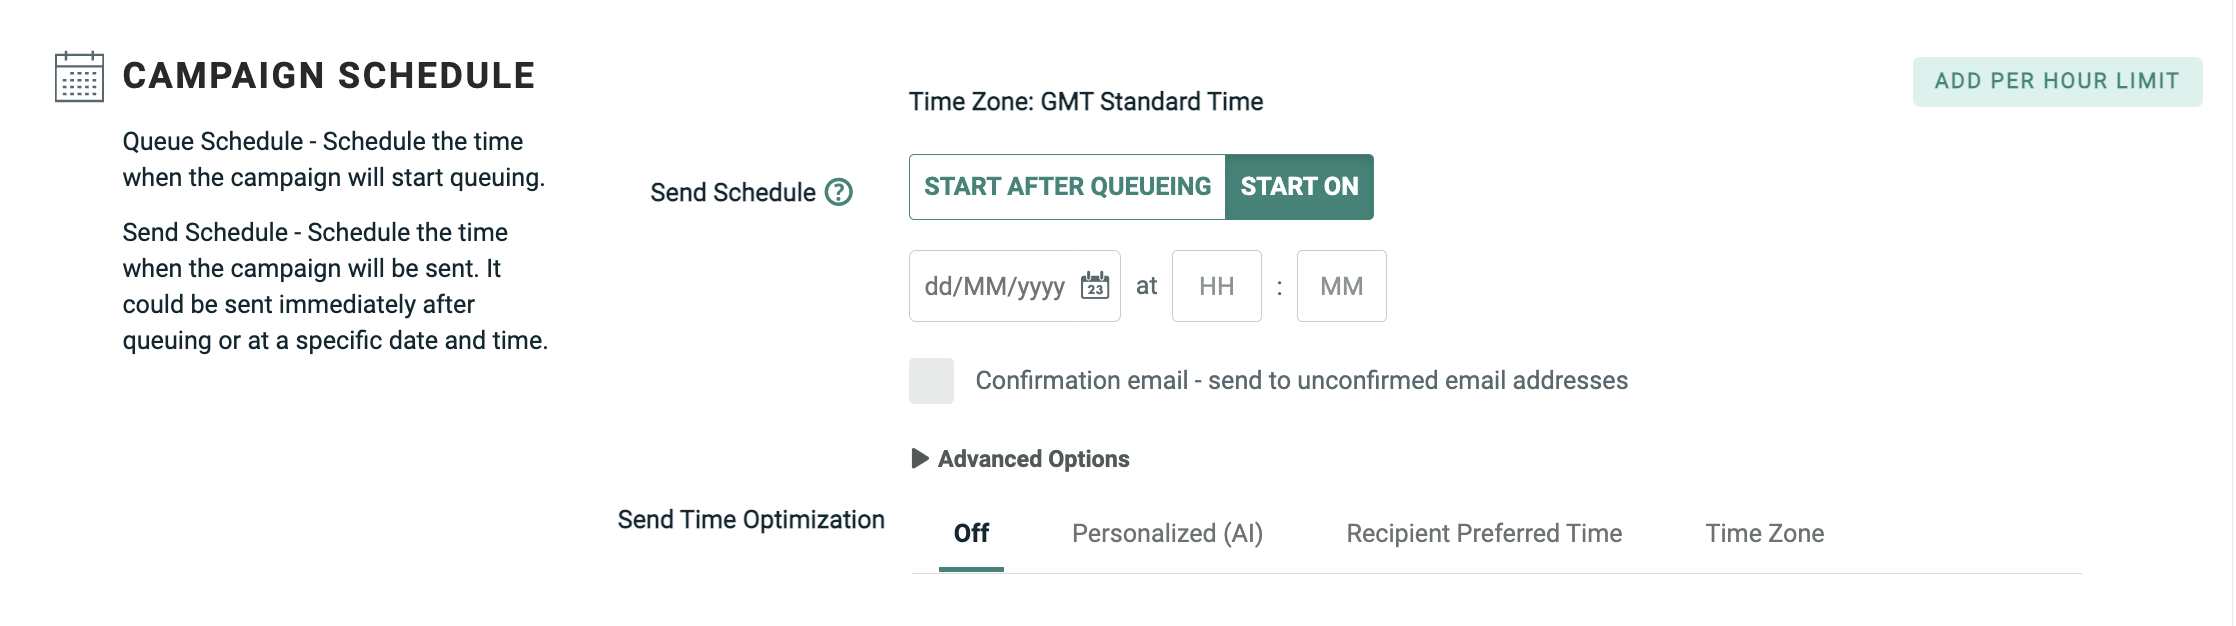
Send Schedule Start: This component controls when you want the message sending phase to begin. You can either select "Immediately," meaning the Send Schedule will go live immediately after the Campaign is launched (messages will deploy after the message building phase is complete), or you can set a start date / time in the future. By default, the Campaign will continue sending messages until they've all been sent, at which time the Campaign is considered "Done." Optionally, you can set an end date / time when you want to stop sending messages.
-
Sending Window: This optional component allows you to define a limited daily time range, or "window," during which time the platform will send messages. If the Campaign doesn't complete the sending process during the Sending Window, the remaining recipients will stay held in the queue until the next window.
-
Sending Frequency: Sending Frequencies are more commonly used in Date-triggered Campaigns that deploy more than once. However, you can optionally define a daily or weekly Sending Frequency for a Regular One-off Campaign. This component is mainly intended for use by clients with large-volume Campaigns that use a Sending Window and throttle sending volumes, so the entire Campaign deployment may stretch out over multiple days. The use of a Sending Frequency in this scenario gives the client more control over when the Campaign will resume sending.
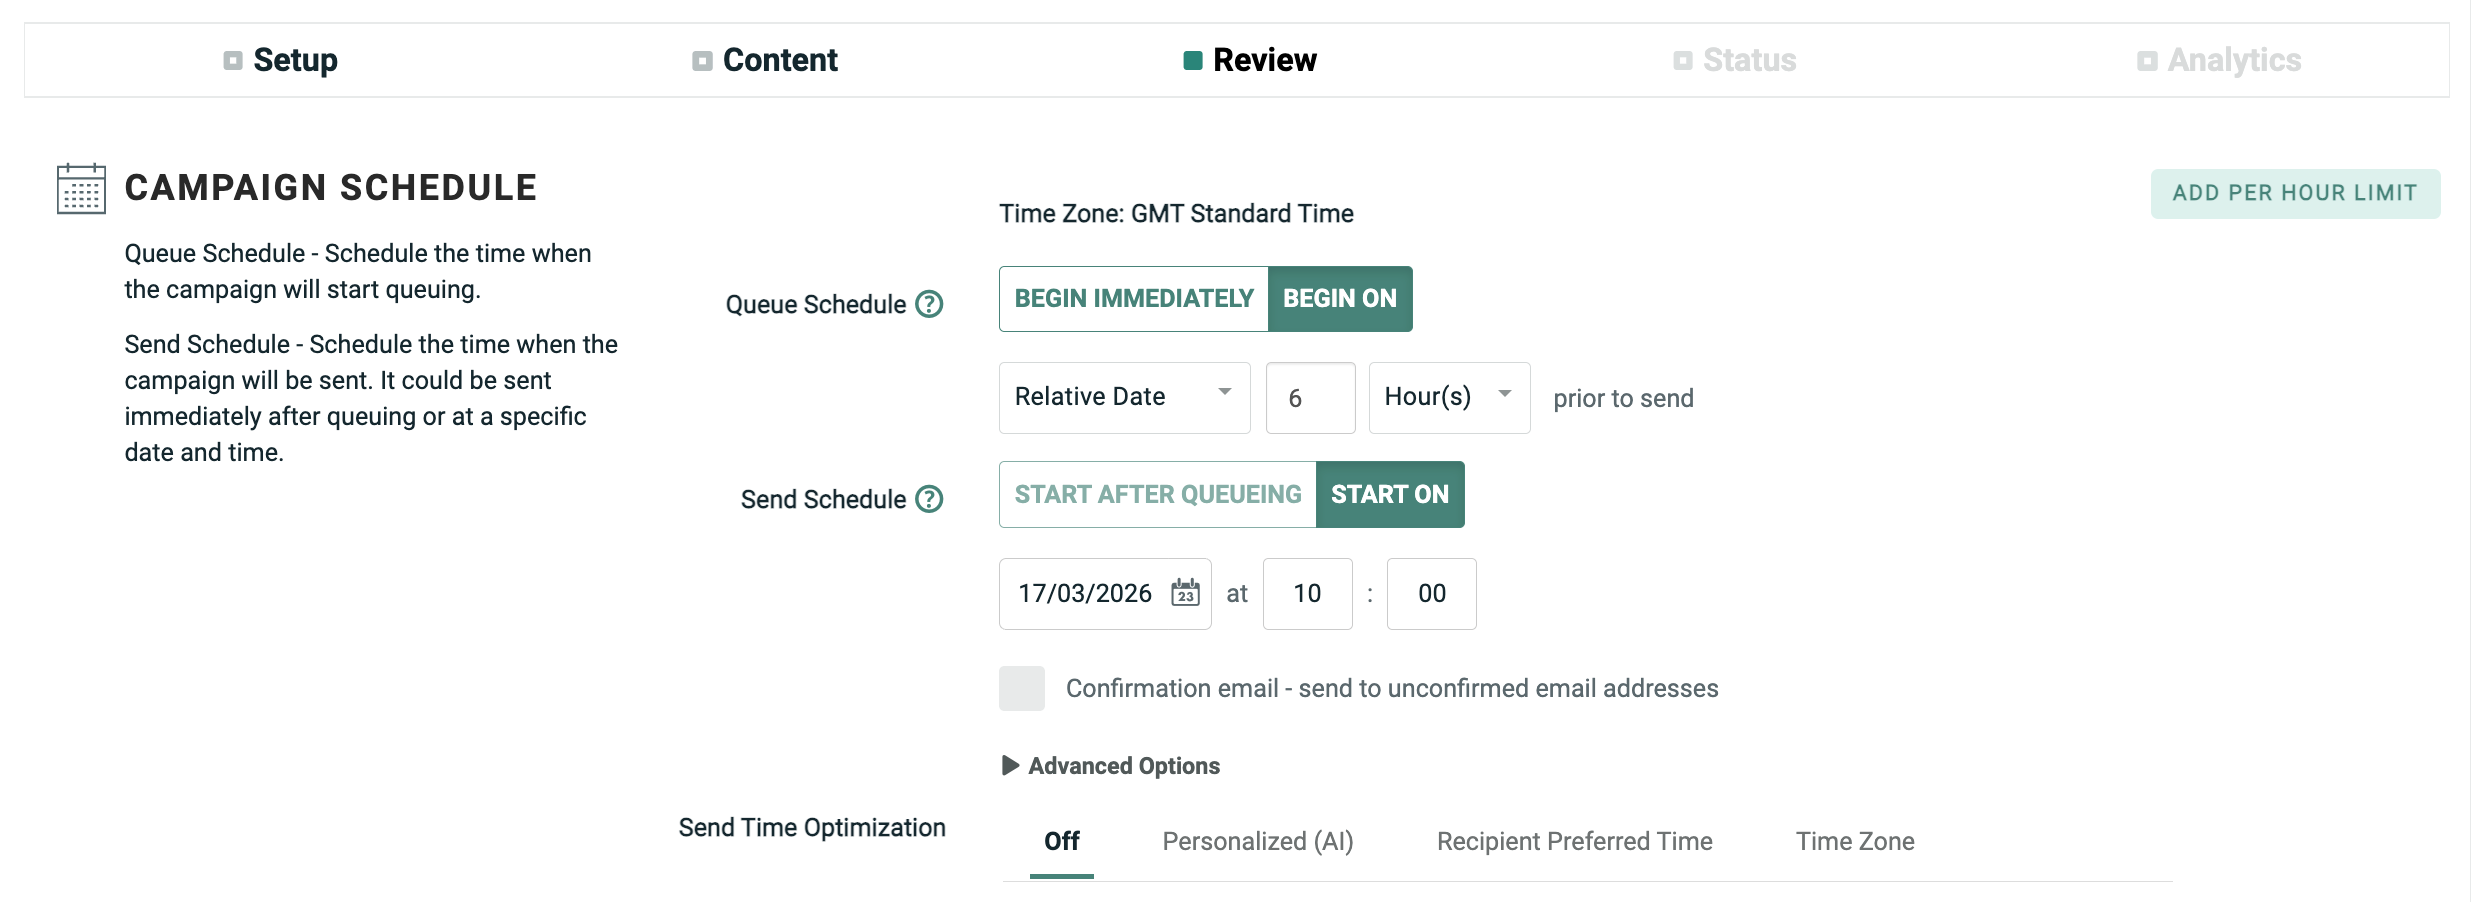
The schedule options are displayed within the Review tab of the Enhanced Workflow Campaign screen.
The platform allows you to define an Advanced Queue Schedule, which refers to the concept of building messages ahead of the exact date and time when you want messages to get sent. When this feature is used, messages are created and held in the processing queue until the specified Send Schedule Start date / time, at which time the queued messages are then sent.
An Advanced Queue Schedule allow you to control the exact sending time with more precision. If you don't use an Advanced Queue Schedule, the platform will start sending messages as soon as the message building phase is complete, and it's hard to predict exactly how long the message building phase will take. If you need to send messages at a specific date / time, then you typically will want to set up an Advanced Queue Schedule, to build the messages ahead of the required send date / time.
Note: Federal CAN-SPAM regulations state that we must process unsubscription requests within ten days. In order to maintain compliance with these regulations, you should never set an Advance Queue period longer than nine days. That is, you should never build messages, then wait more than nine days to send them.
The platform checks the recipient's eligibility to be contacted as part of the message building phase. The recipient's eligibility is NOT rechecked when the messages are actually sent. Therefore, it's possible that a recipient could unsubscribe during that time period between building the message, and sending the message.
Consider the following example: you launch a Campaign on April 1 with the Queue Schedule set to "Start Immediately." The Send Schedule is delayed until two weeks later, on April 15. The system begins building messages immediately on April 1. A particular recipient is subscribed, and included within the Campaign Audience. His record is built and held in the queue. Then this recipient unsubscribes on April 3. His status within the database is changed to "unsubscribed." However, his message is already in the queue, and on April 15 (twelve days later), his message is sent. We would be out of compliance with federal regulations because we're continuing to contact this recipient more than ten days after we received his unsubscribe request.
Therefore, in order to remain compliant with these regulations, the Advanced Queue period should never be greater than nine days.
Examples
This section contains a variety of examples, in order to illustrate the different Campaign scheduling options for a Regular One-off Campaign.
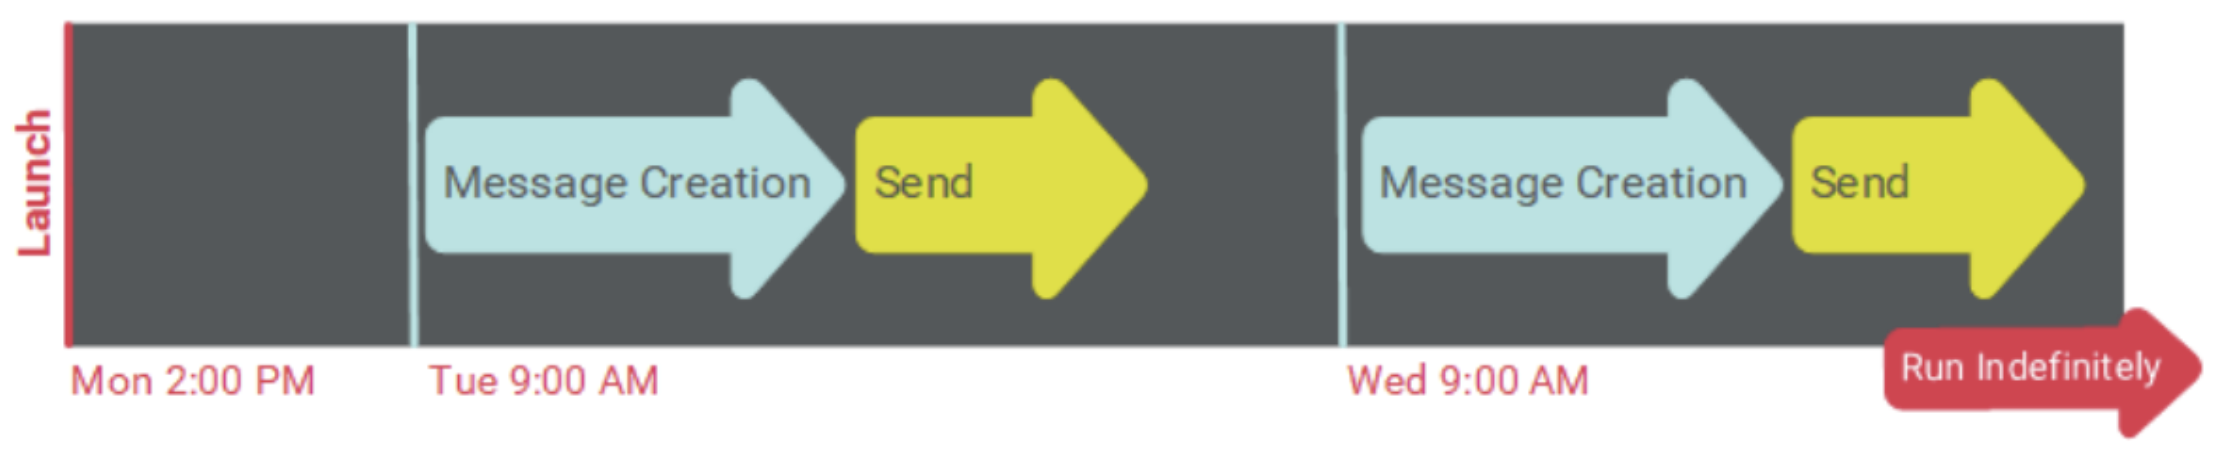
Default schedule
The default schedule settings (depicted above) for a Regular One-off Campaign are to begin the Queue Schedule immediately upon launching the Campaign, and to enter a custom Send Schedule start date / time (with no Sending Window).
The following diagram depicts the default schedule scenario for a Regular One-off Campaign, with an immediate message building phase, and a user-defined message Send Schedule start date and time.

In this example, the Send Schedule was configured to start on Tuesday at 8:00 AM, and the Campaign was launched on Monday. Messages were created immediately, but held in the queue until the Send Schedule start date / time, at which point the messages were sent.
Start both schedules immediately
Optionally, you can set both the Queue Schedule and the Send Schedule to start immediately. In this scenario, the system will begin the message building phase as soon as the Campaign is launched. The system will then send these messages immediately after the message building phase is complete.
The following diagram depicts a Regular One-off Campaign, with both schedules set to start immediately (with no Sending Window).
Delayed queue schedule start
Optionally, you can delay the Queue Schedule start date / time to some point in the future, after the Campaign is launched. For example, you may need to wait until additional data is loaded to the platform, or to allow time for additional changes to the message content. In this scenario, you'll need to define the Queue Schedule start date / time. When the Campaign is launched and approved, the messages will not be created until this scheduled date and time.
The following diagram depicts the use of a user-defined Queue Schedule start date / time.

In this example, the Queue Schedule was configured to start on Wednesday at 2:00 PM, and the Send Schedule was set to "immediately" (i.e., after the message building phase is completed). The Campaign was launched on Monday. The platform didn't start the message building phase until Wednesday at 2:00 PM, then sent the messages as soon as they were built.
Derived queue schedule start
When setting the Queue Schedule start, you can define a specific date / time as described above, or you can optionally derive this start date / time by calculating backwards from a specified Send Schedule start date / time. When deriving the Queue Schedule start, be sure to give the message building phase enough time to complete, so that your Campaign deploys at the desired time. If you need help determining what this duration should be, please speak with your Client Services Representative.
The following diagram depicts the use of a derived Queue Schedule start.
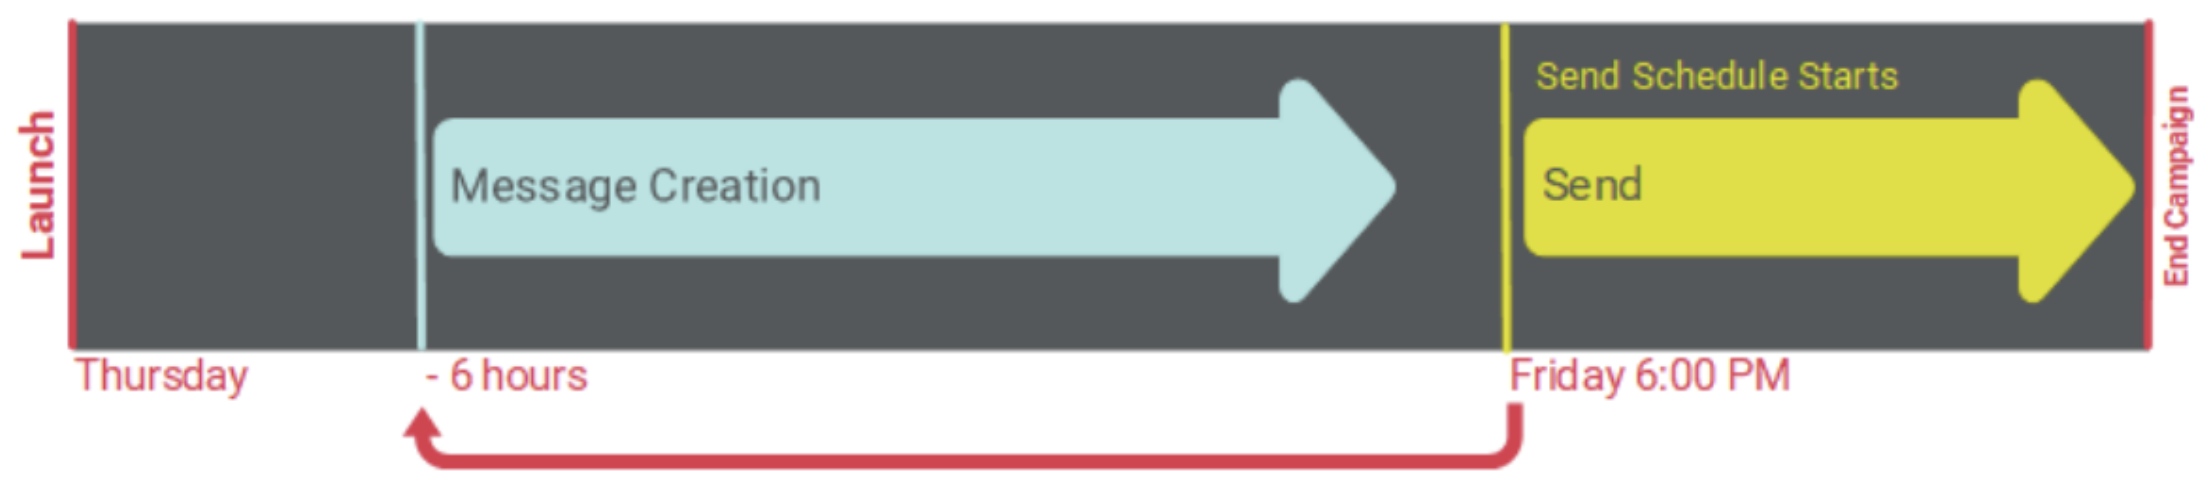
In this scenario, the Send Schedule was set to start on Friday at 6:00 PM. In order to make sure messages deployed at exactly that date and time, the Queue Schedule was configured to start "six hours before the Send Schedule start date / time."
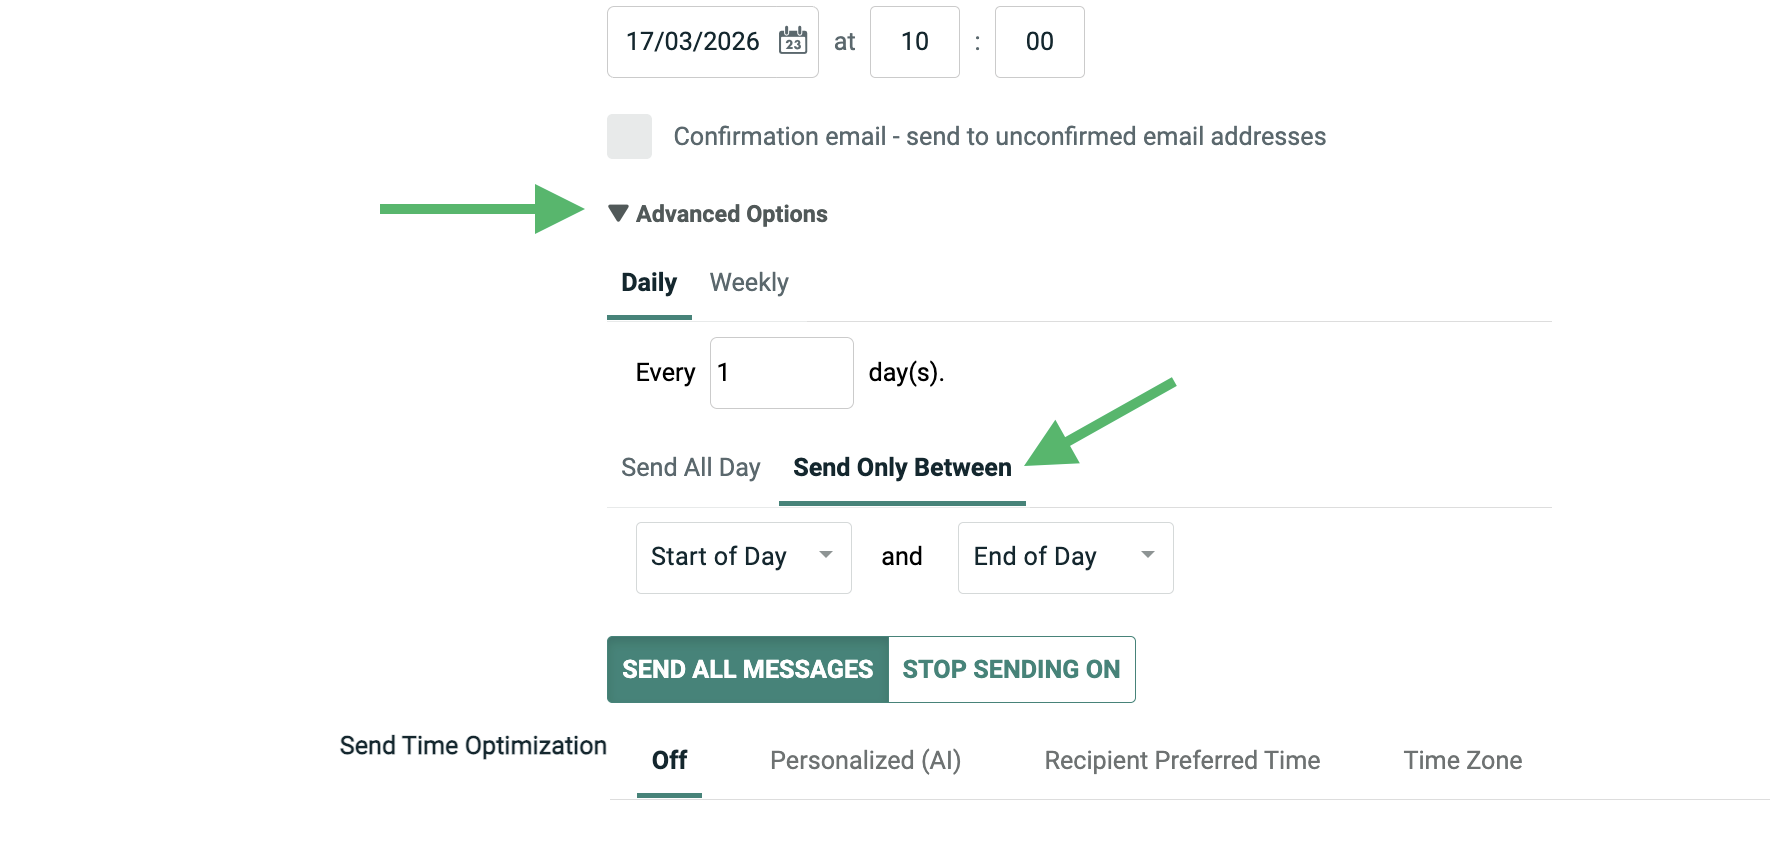
Sending window
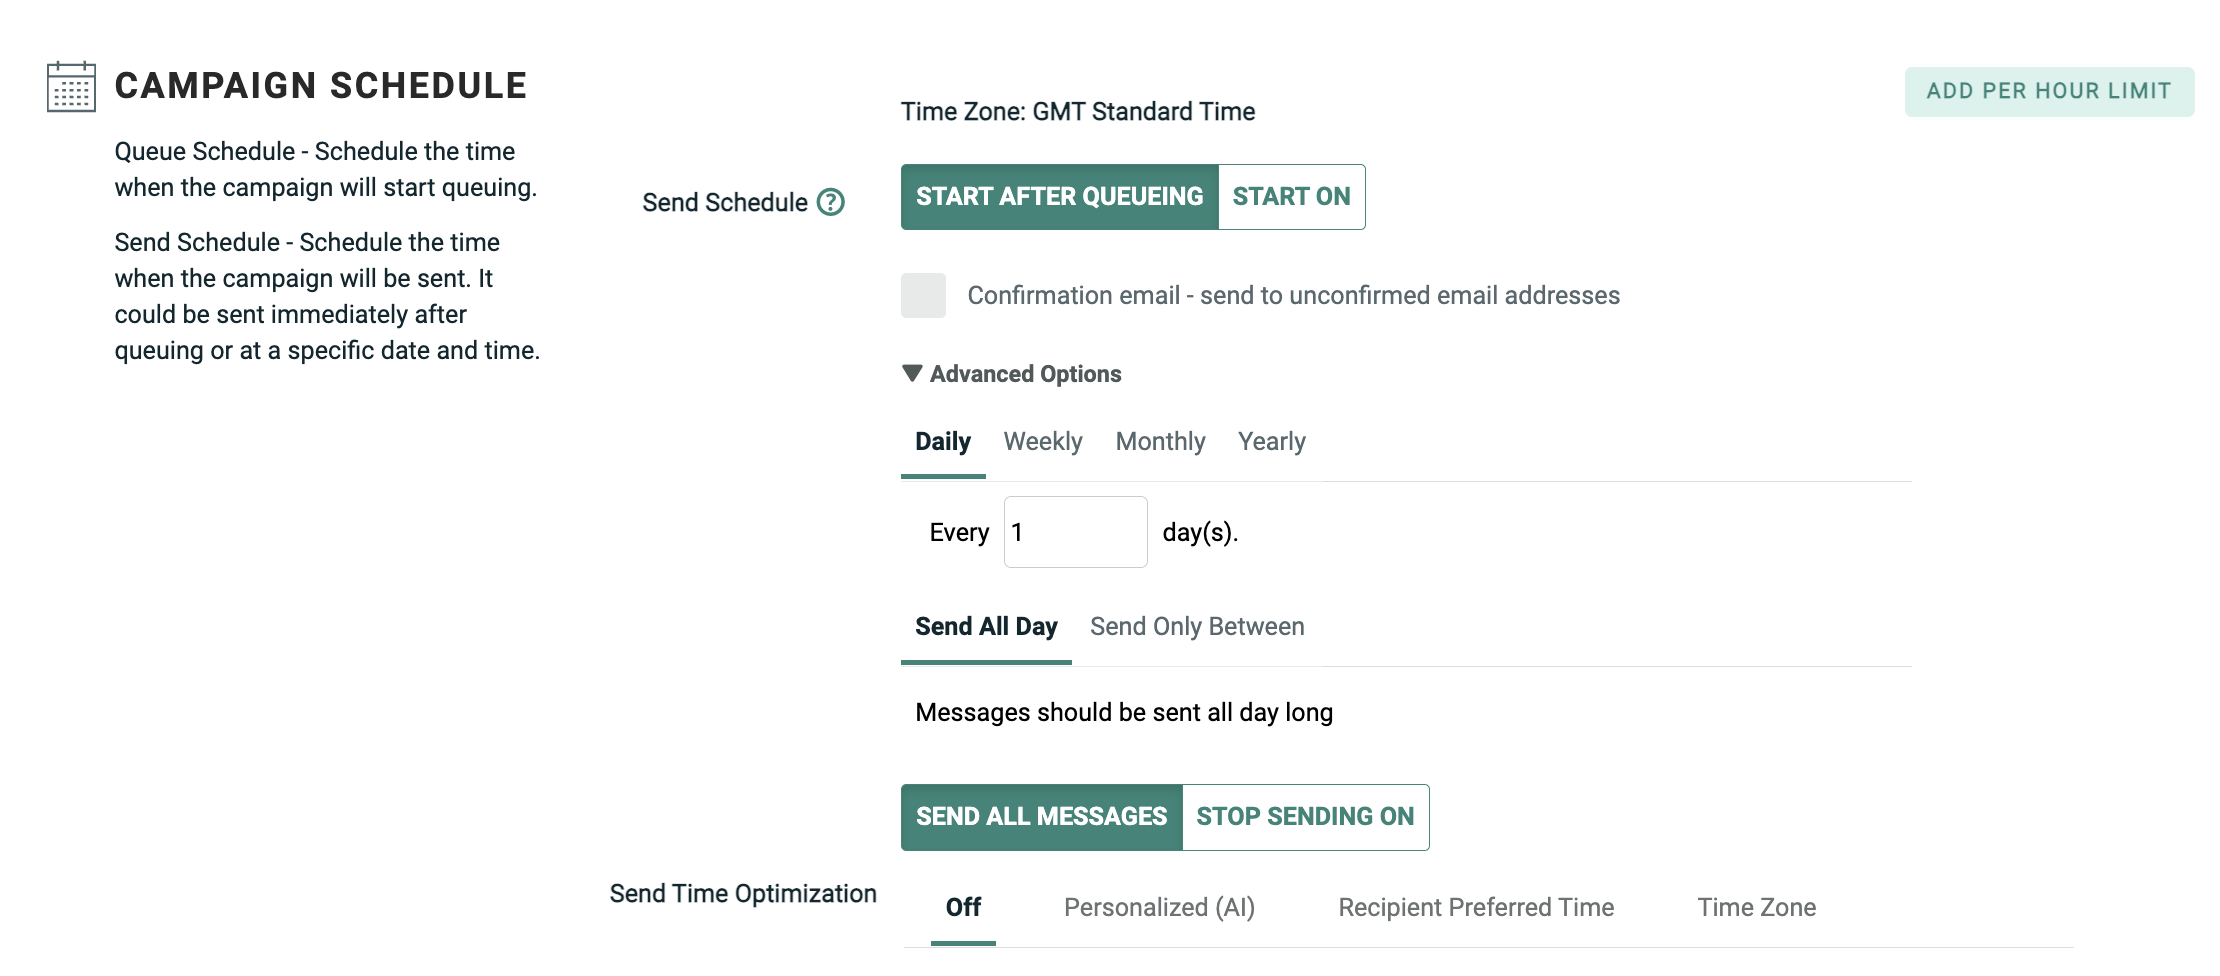
By default, the platform will send messages all day long, until all of the messages have been sent, and the Campaign ends. Optionally, you can define a daily Sending Window, which sets a begin time and end time. The platform will send messages only during this Sending Window. If the Campaign doesn't complete the sending process during the Sending Window, the remaining recipients will stay queued until the next window.
The Sending Window options are displayed within the Advanced Options panel.
The following diagram depicts the use of a Sending Window. In this scenario, the Queue Schedule and the Send Schedule were both set to "Immediately." However, the client wanted to send messages only between 12:00 PM and 5:00 PM in order to control the amount of traffic to their website.
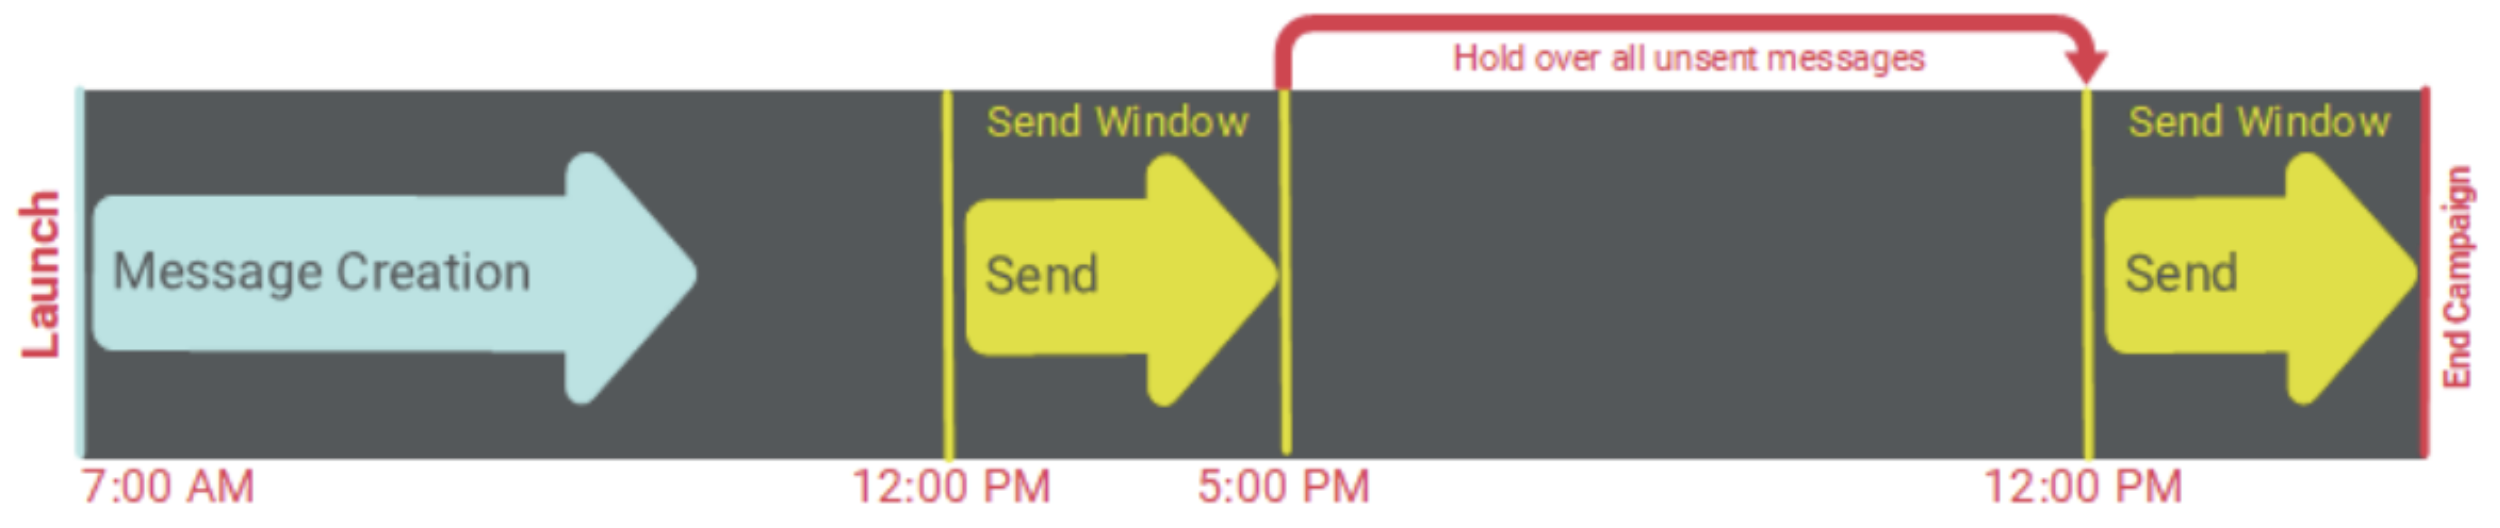
The Campaign was then launched at 7:00 AM. The message building phase began immediately, but the messages were held in the queue until the Sending Window started at 12:00 PM. Then later at 5:00 PM, when the Sending Window ended, the platform hadn't finished sending all the messages yet, so the remaining messages were held in the queue until the next Sending Window the following day.
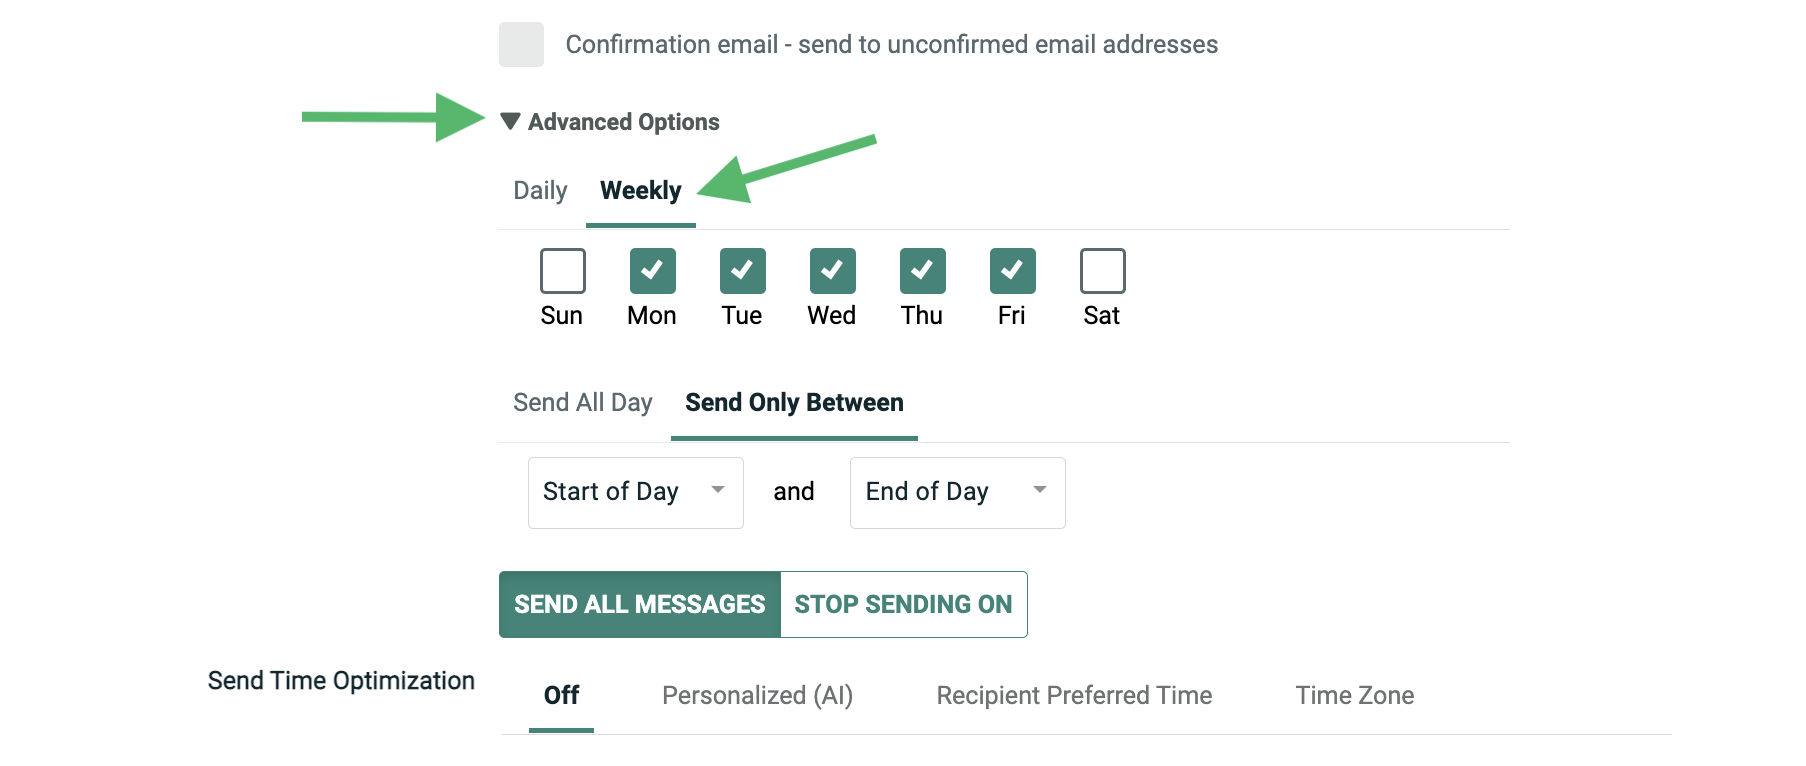
Sending frequency
The use of a Sending Frequency in a Regular One-off Campaign typically applies to clients who send large Campaigns with the use of a Sending Window (and often also throttle sending volumes). In this scenario, the Campaign deployment could span multiple days.
The use of a Sending Frequency provides you with more control over when the next Sending Window will resume. For example, perhaps you want the Campaign to deploy only on weekdays, and skip Saturday and Sunday.
The Sending Frequency options are displayed within the Advanced Options panel.
The following diagram depicts the use of a Sending Window in conjunction with a Sending Frequency. In this scenario, the Queue Schedule and the Send Schedule were both set to Immediately. However, the client wanted to send messages only between 12:00 PM and 5:00 PM, and only on weekdays.
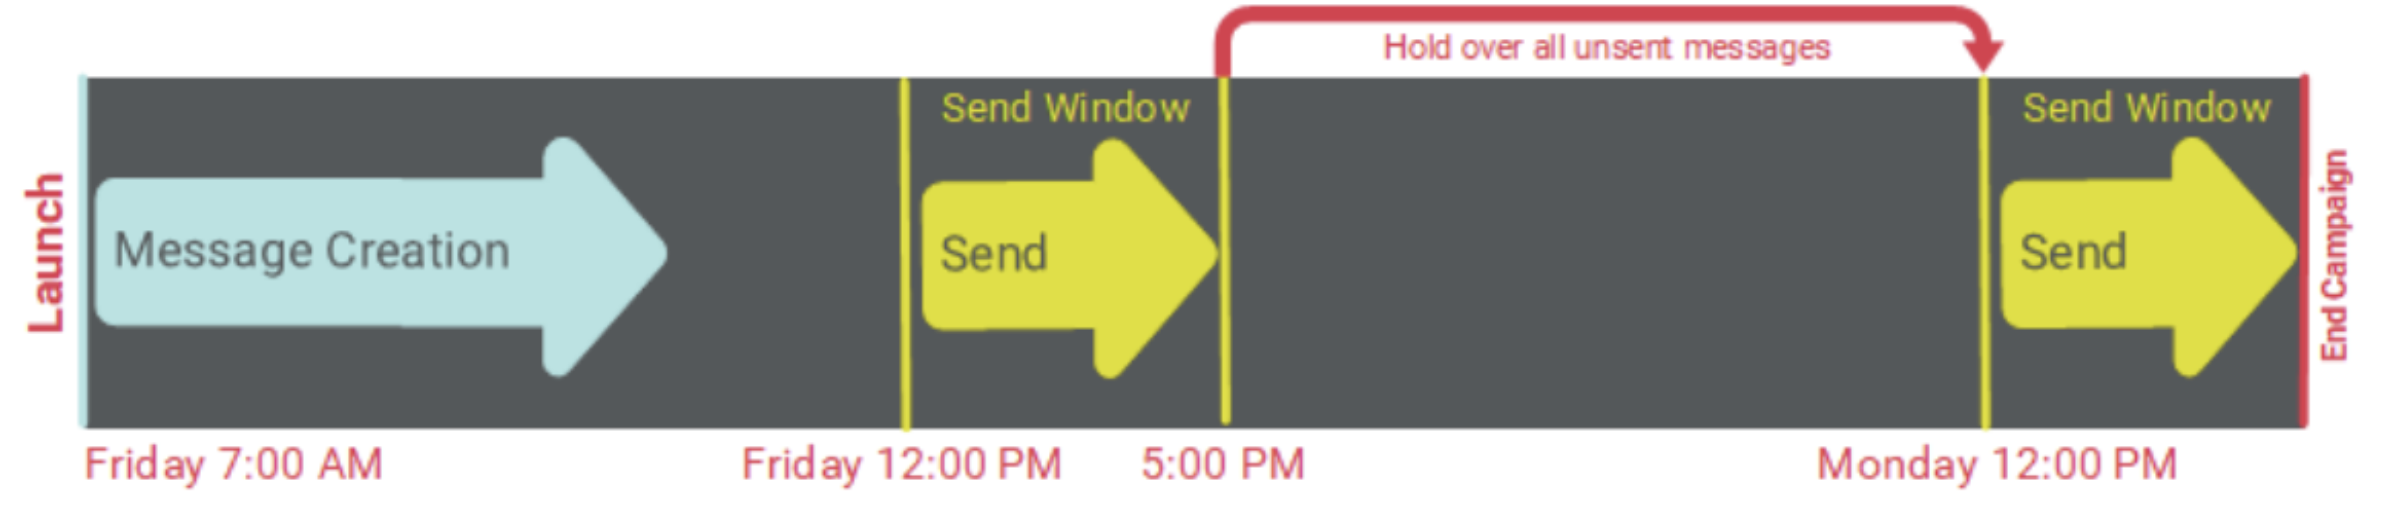
The Campaign was then launched on Friday 7:00 AM. The message building phase began immediately, but the messages were held in the queue until the Sending Window started at 12:00 PM. Then later at 5:00 PM, when the Sending Window ended, the platform hadn't finished sending all the messages yet, so the remaining messages were held in the queue until the next Sending Window. Due to the Sending Frequency configuration, the platform skipped Saturday and Sunday, and resumed sending on Monday at 12:00 PM.
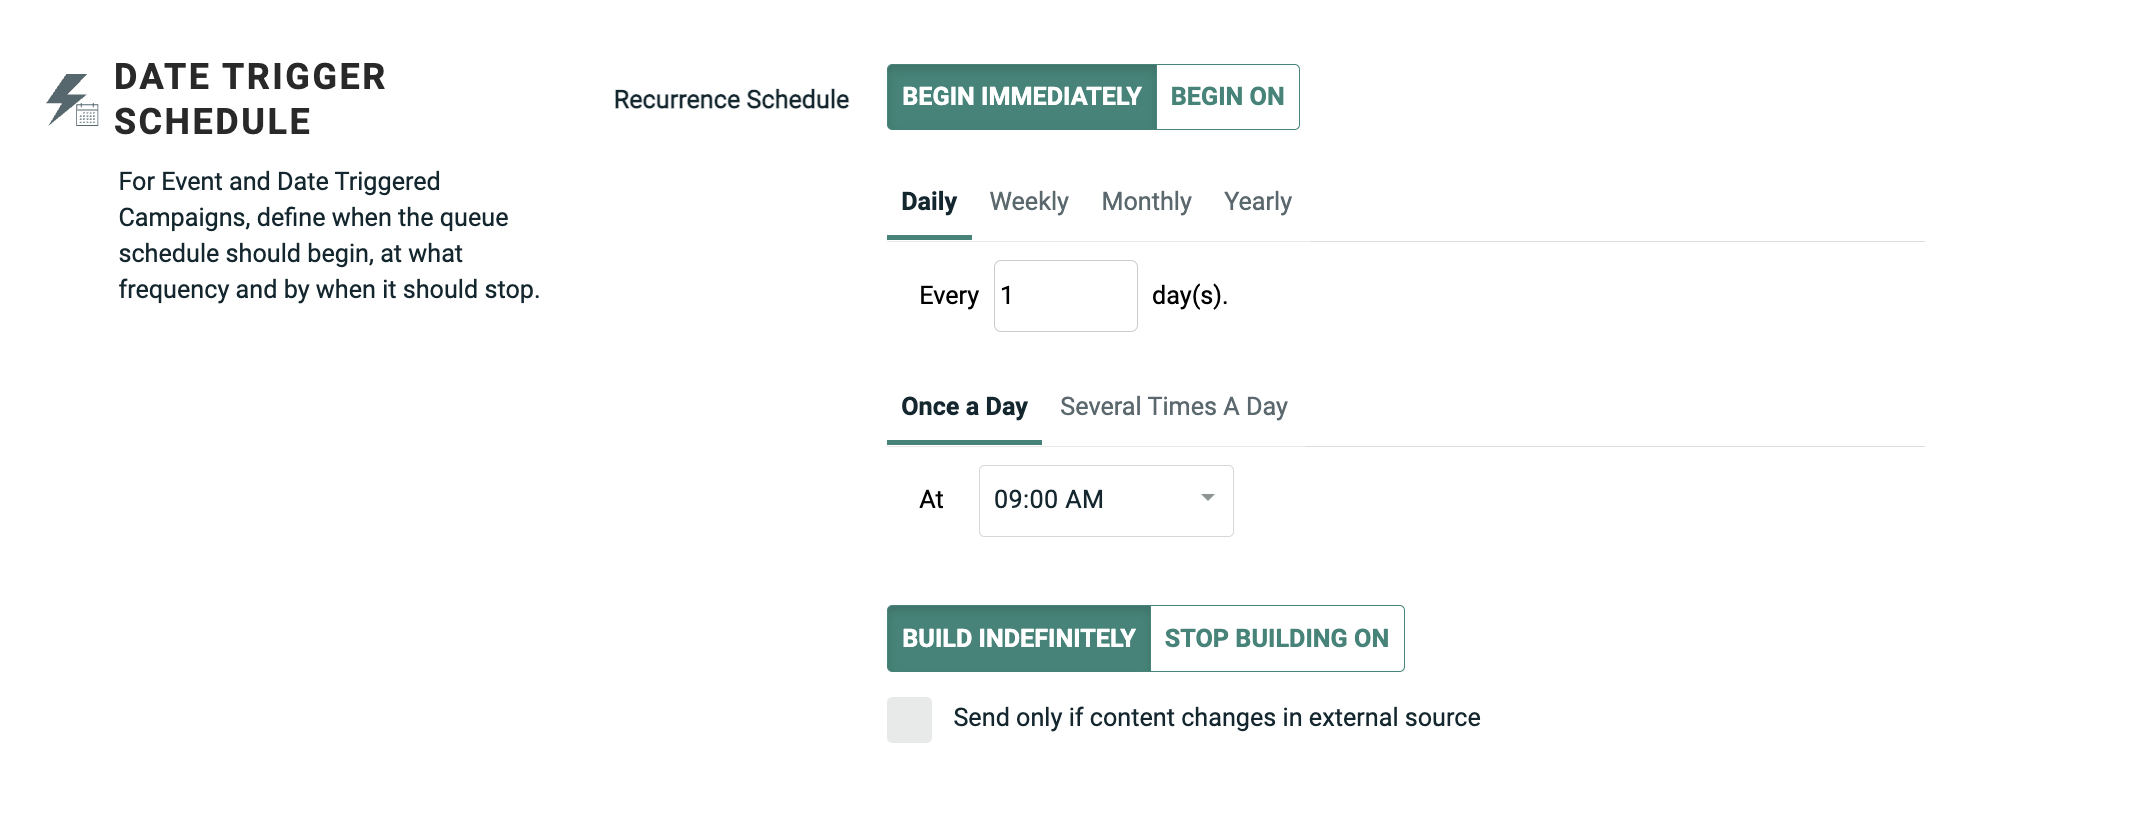
Date-triggered Campaigns
Scheduling options
As described above, a Campaign goes through two separate and distinct phases when it's launched: building messages and sending messages. For a Date-triggered Campaign, the execution of these two phases is controlled by a "Recurrence Schedule." The concept of a Recurrence Schedule is unique to Date- triggered Campaigns, and it defines when, and how often, the Campaign will execute the Filter to determine the Audience of recipients, then build and deploy messages to those recipients.
The scheduling options for a Date-triggered Campaign are very flexible, in order to accommodate a wide range of client business requirements. Generally speaking, there's no one "right way" to set up a Date-triggered Campaign schedule. The client's business requirements must be interpreted into the Messaging user interface, in order to successfully accomplish what the client needs to do.
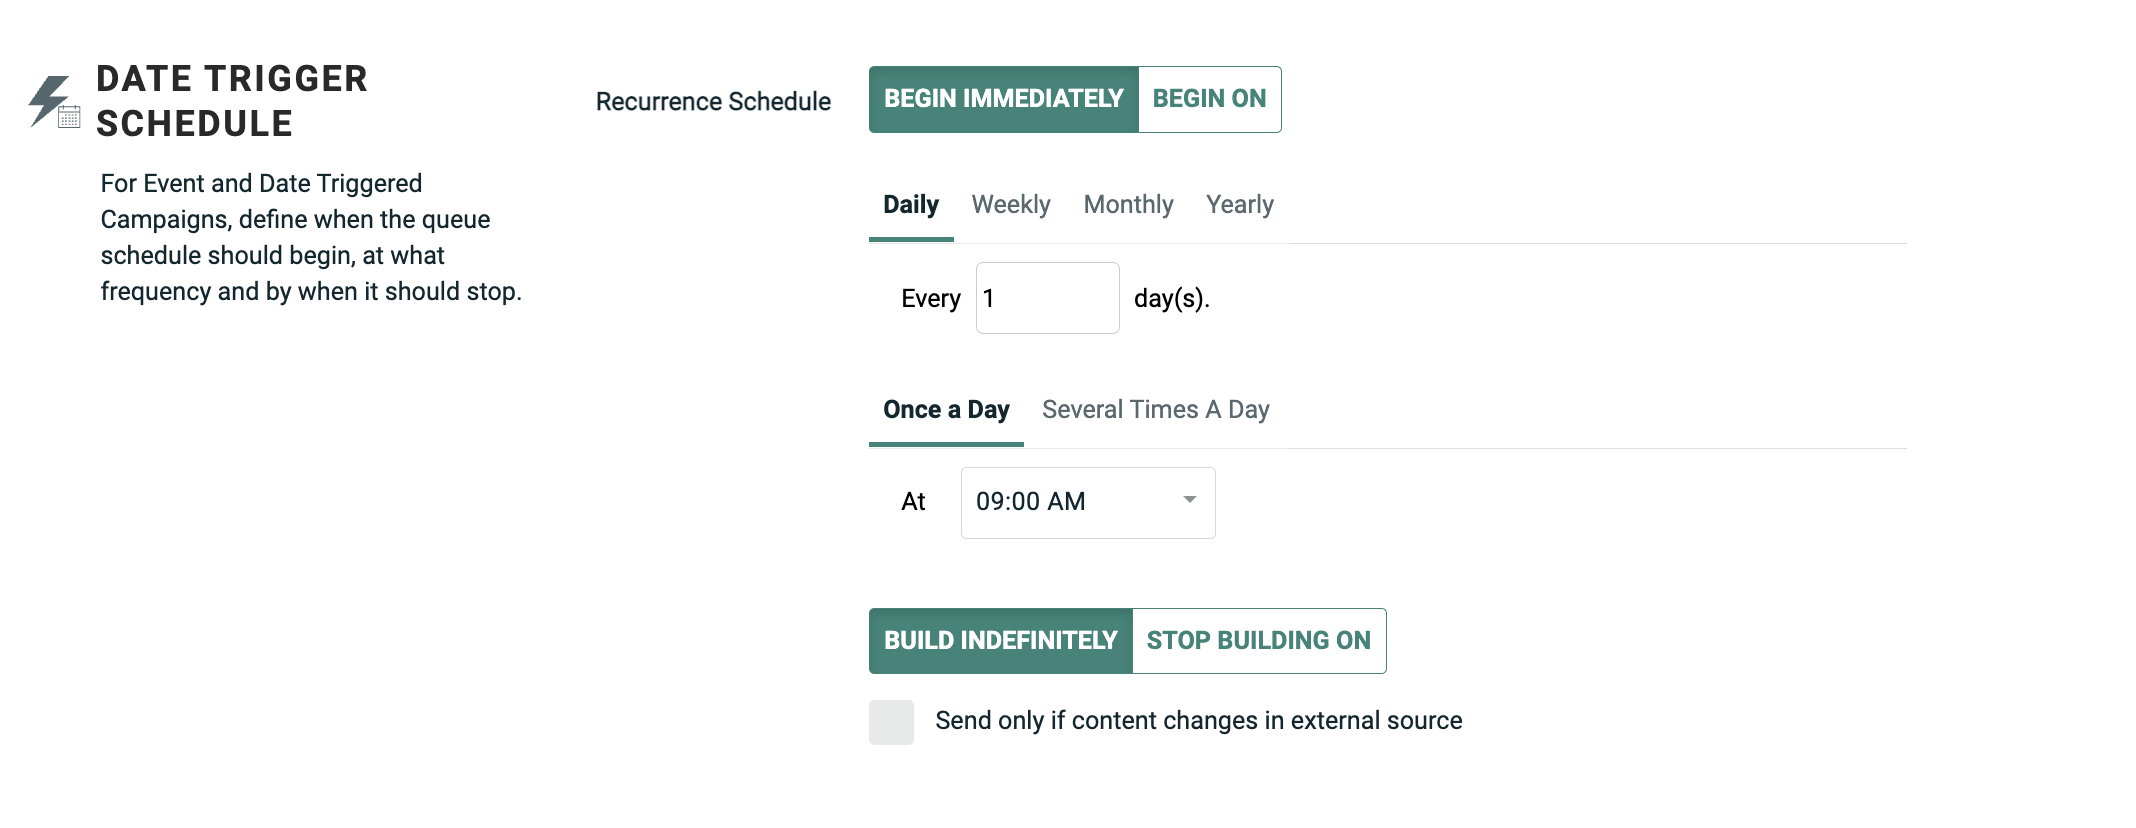
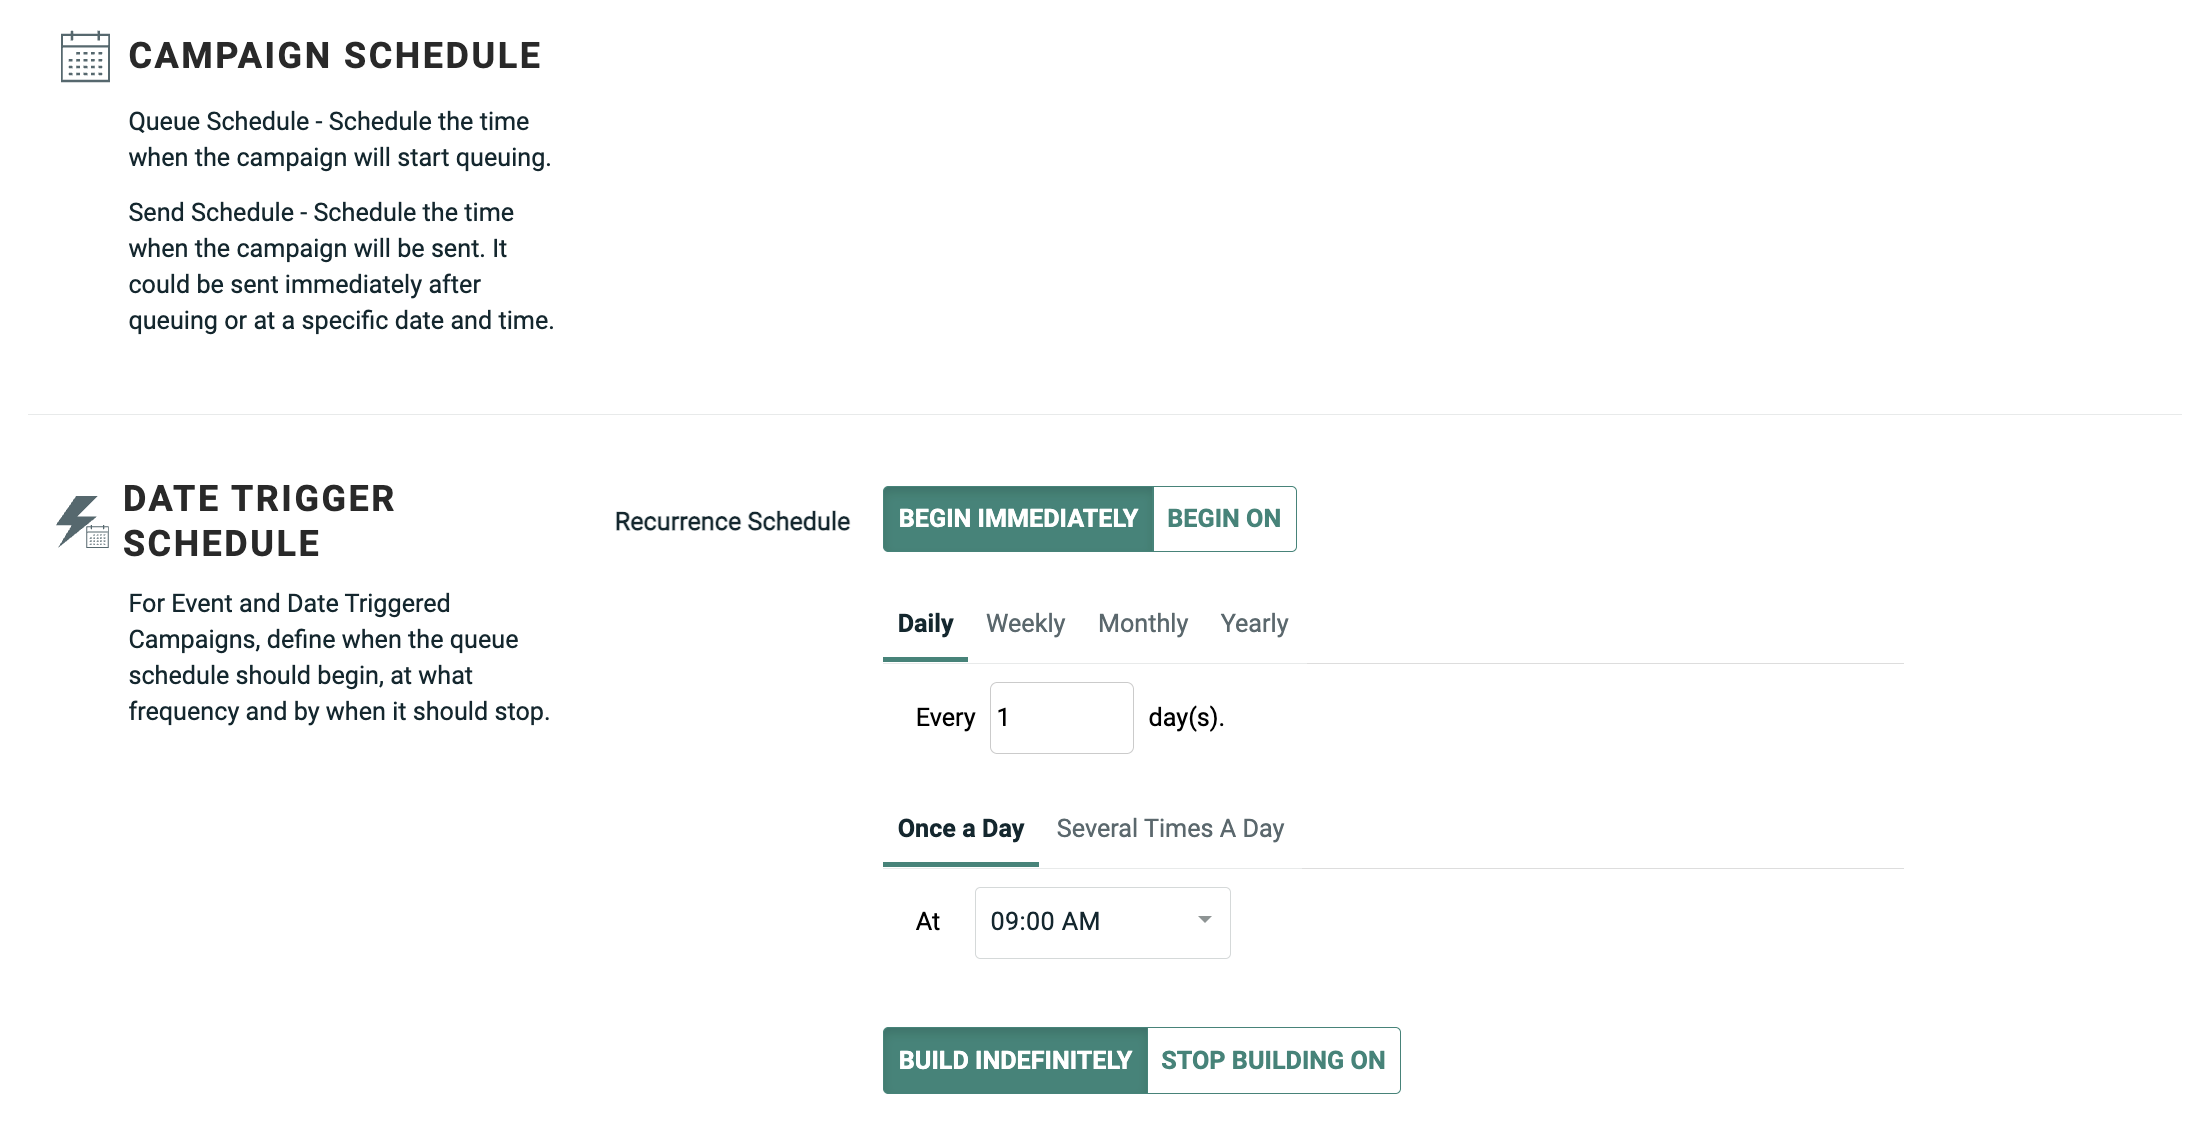
The schedule for a Date-triggered Campaign comprises the following components:
-
Recurrence Schedule Start: This component controls when you want the Recurrence Schedule to be active, or to go "live." You can either select "Immediately," meaning the Recurrence Schedule will go live immediately after the Campaign is launched, or you can set a start date / time in the future. You can also optionally set an end date / time for the Recurrence Schedule, or let the schedule run indefinitely (until the Campaign is stopped or cancelled).
-
Send Schedule Start: This component controls when you want the Send Schedule to be active, or to go "live." You can either select "Immediately," meaning the Send Schedule will go live immediately after the Campaign is launched, or you can set a start date / time in the future.
-
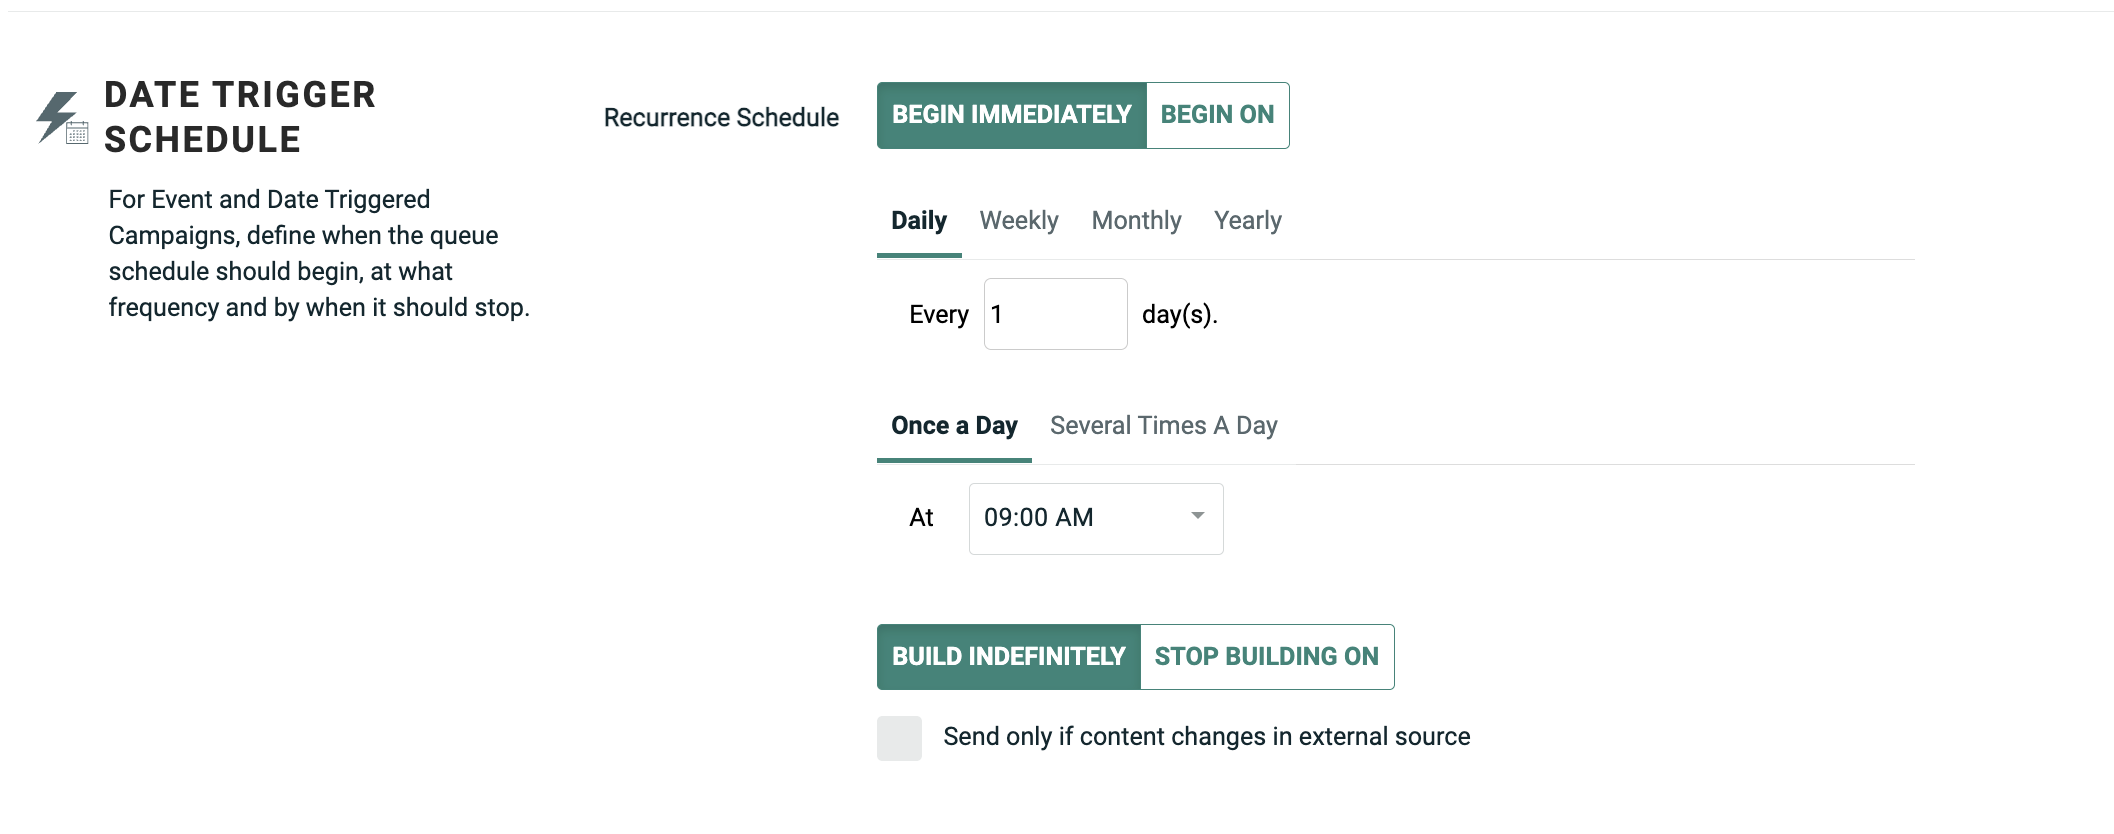
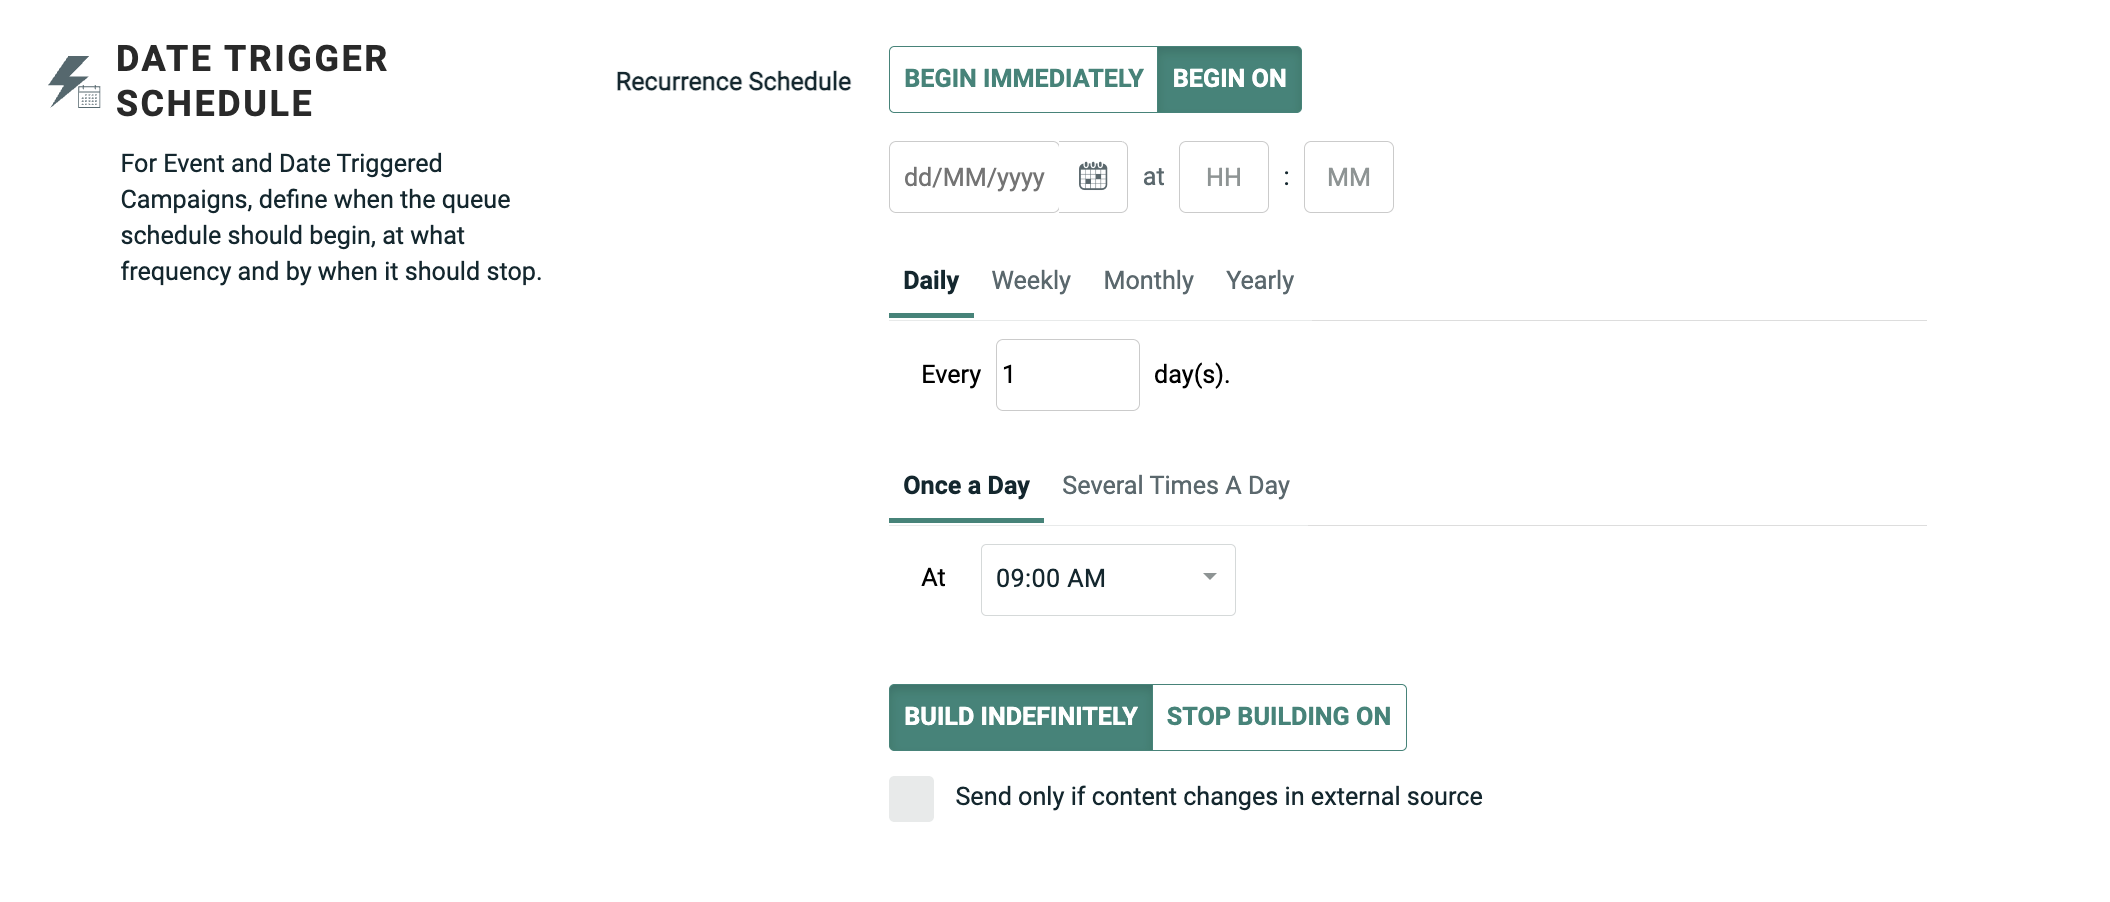
Recurrence Schedule Frequency: Once the Recurrence and Send Schedules are "live," this component controls when, and how often, the Campaign will execute the Audience Filter, build new messages, and send them. This frequency can be set using a daily, weekly, monthly, or yearly interval. Also, the frequency can be set to run once a day at a specified time, or to run multiple times a day, with the optional use of a Building Window.
-
Building Window: This component allows you to define a limited time range, or "window," during which time the platform will build messages. If the Campaign doesn't complete the building process during the Building Window, the remaining messages will get built during the next window.
-
Sending Window: This component allows you to define a limited time range, or "window," during which time the platform will send messages. If the Campaign doesn't complete the sending process during the Sending Window, the remaining recipients will stay queued until the next window.
The schedule options are displayed within the Review tab of the Enhanced Workflow Campaign screen.
Examples
This section contains a variety of examples, in order to illustrate the different Campaign scheduling options for a Date-triggered Campaign.
Default schedule
The default schedule settings for a Date-triggered Campaign (depicted above) are to start both the Recurrence Schedule and the Send Schedule immediately upon launching the Campaign, and to use a Recurrence Schedule Frequency of "once daily, every day, at 9:00 AM" (with no Building Window or Sending Window).
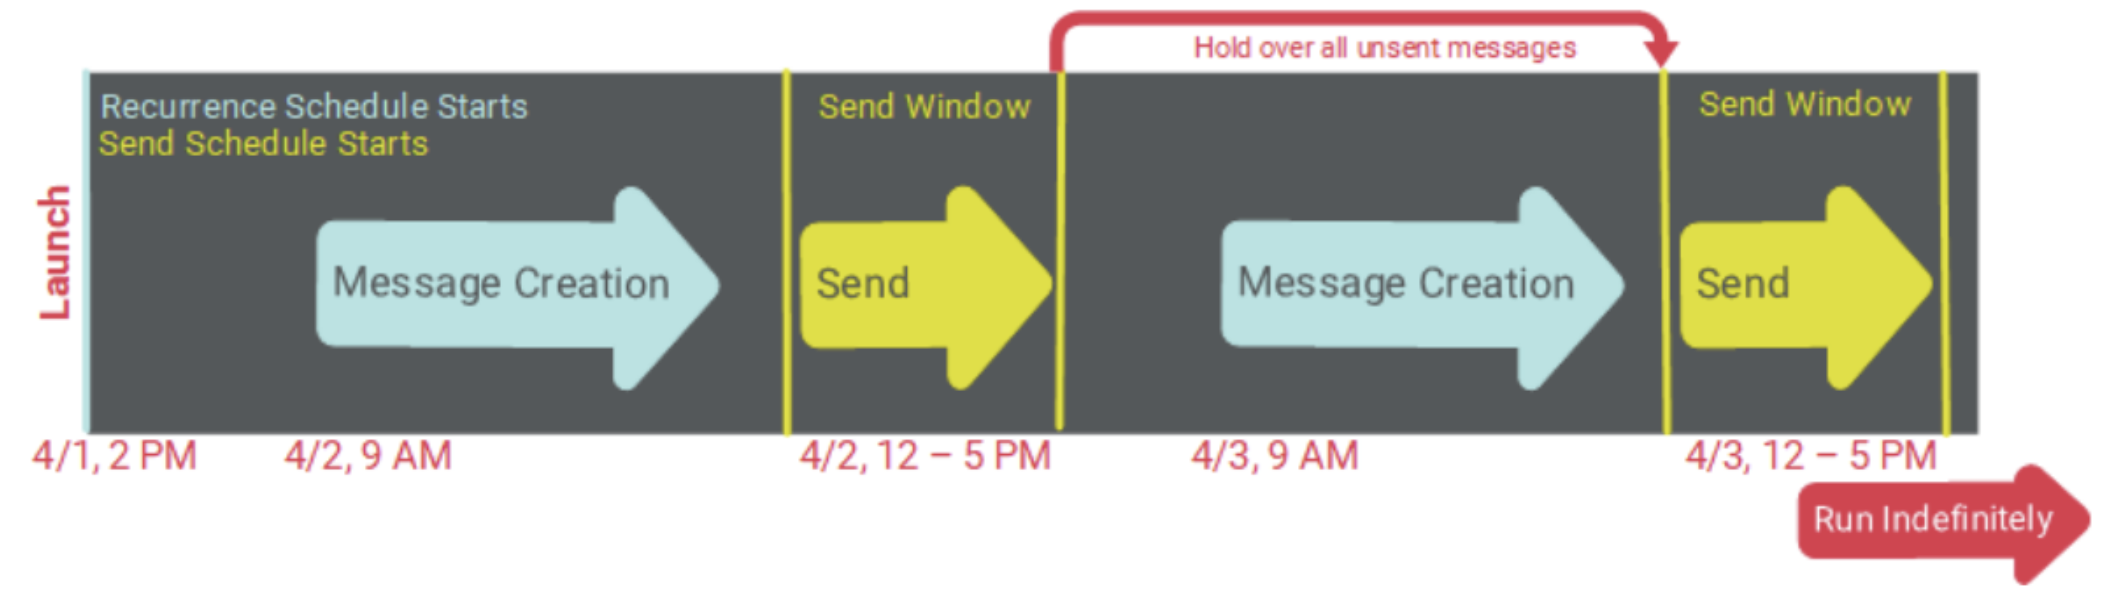
The following diagram depicts the default schedule scenario for a Date-triggered Campaign.
In this example, the Campaign was launched on Monday at 2:00 PM. However, you'll note that the Campaign did not actually build or send messages immediately upon launch. The Recurrence and Send Schedules both went "live" upon Campaign launch, but the actual execution of the Campaign is controlled by the Recurrence Schedule Frequency -- daily at 9:00 AM. The next iteration of this Recurrence Frequency was not until the following day, Tuesday, at 9:00 AM, which is when the Campaign built and sent messages for the first time. Then going forward, the Campaign built and sent messages every subsequent day at 9:00 AM.
Delay both schedule starts
You can delay both the Recurrence Schedule and the Send Schedule by setting start dates / times for both. Please note that the Send Schedule start date / time must either be the same as, or after, the Recurrence Schedule start date / time.
In this scenario, the platform won't do anything when the Campaign is initially launched. When the start dates / times are reached, the schedules will then go "live."
The following diagram depicts a Date-triggered Campaign where the Recurrence and Send Schedule start dates were delayed post-launch. The Recurrence Frequency was set to "once a day, every day, at noon."
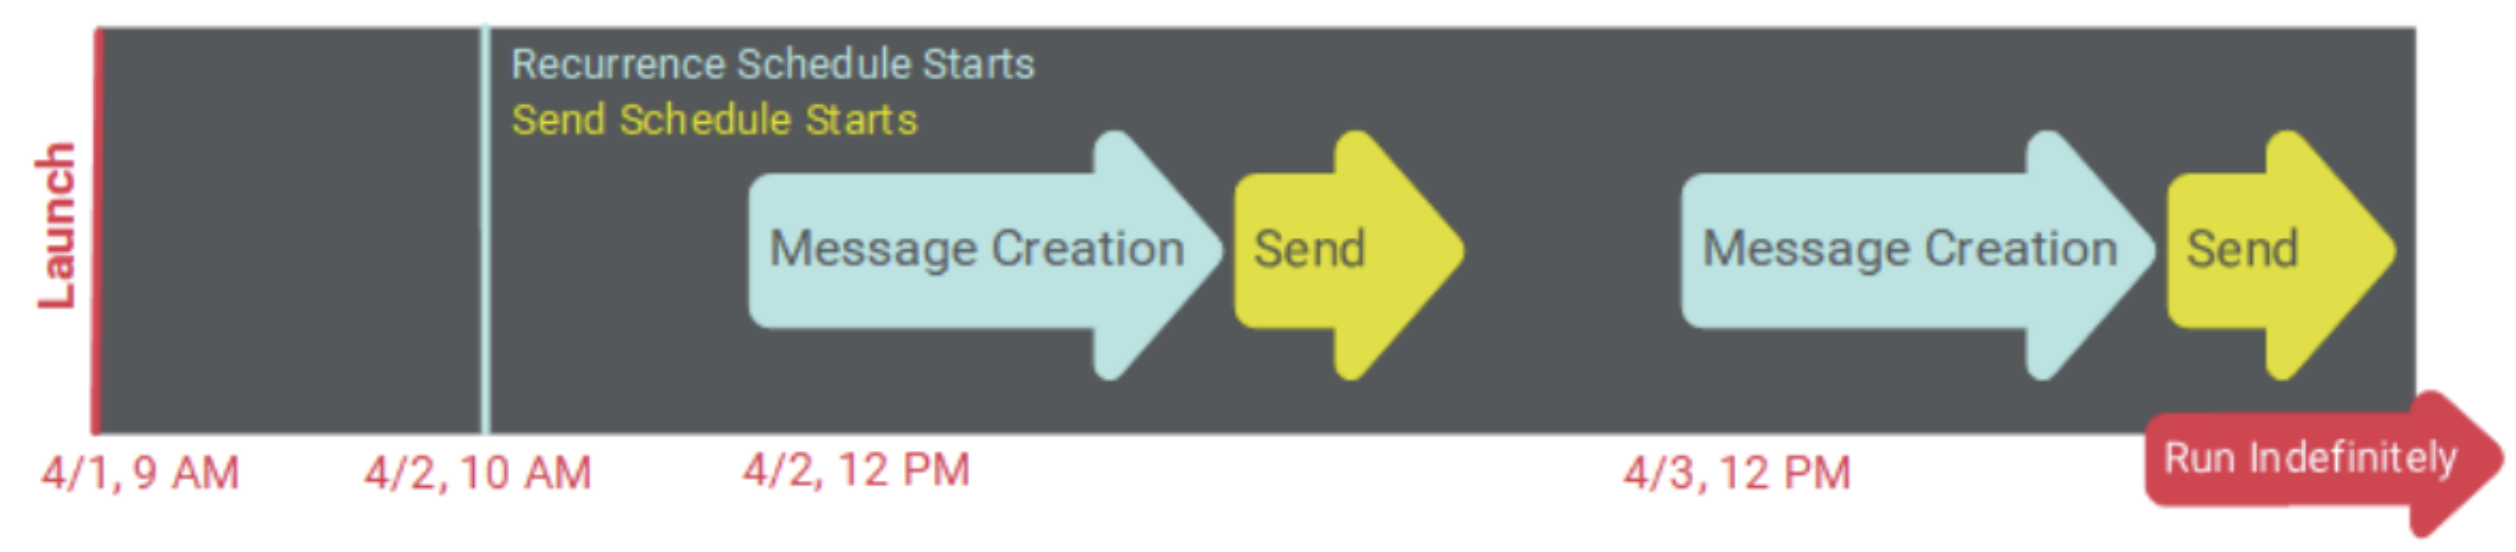
In this example, the Campaign was launched on April 1 at 9:00 AM. Even though the Recurrence Schedule Frequency was set to "daily at noon," nothing happened on April 1 at noon, because the Recurrence and Send Schedules were not yet live.
The following day, April 2, the Recurrence and Send Schedules went live at 10:00 AM. However, the platform did not build and send messages at that moment, because the execution of the Campaign is controlled by the Recurrence Frequency (daily at noon).
Later on April 2, at noon, the Campaign built and sent messages for the first time. Then going forward, the Campaign built and sent messages every subsequent day at noon.
Delayed send scheduled only
Optionally, you can delay the Send Schedule start date / time, and leave the Recurrence Schedule to "start immediately." This scenario is a bit more complex than some of the other Date-triggered Campaign configurations because the initial deployment of the Campaign can potentially execute at a different time than every subsequent deployment.
In this scenario, the system will still execute the message building phase according to the Recurrence Schedule Frequency, but the created messages will be held in the processing queue until the Send Schedule goes live. Depending on how far out you set the Send Schedule, it's possible that the message building phase may even run multiple times, and all those messages will get held in the queue.
Note: As described above in the Regular One-off Campaign section, you should never hold messages in the processing queue for longer than nine days, in order to maintain compliance with federal CAN-SPAM regulations.
At the moment the Send Schedule goes live, the system checks to see if there are message in the queue. If so, the system will send those messages at that moment. Then, following that initial Campaign deployment, all subsequent deployments will follow the Recurrence Schedule Frequency.
The following diagram depicts a Date-triggered Campaign with a delayed Send Schedule. In this example, the Recurrence Schedule was set to start immediately, with a Recurrence Schedule Frequency of "once daily, every day, at 2:00 PM." The Send Schedule was configured to start on April 5 at 10:00 AM.
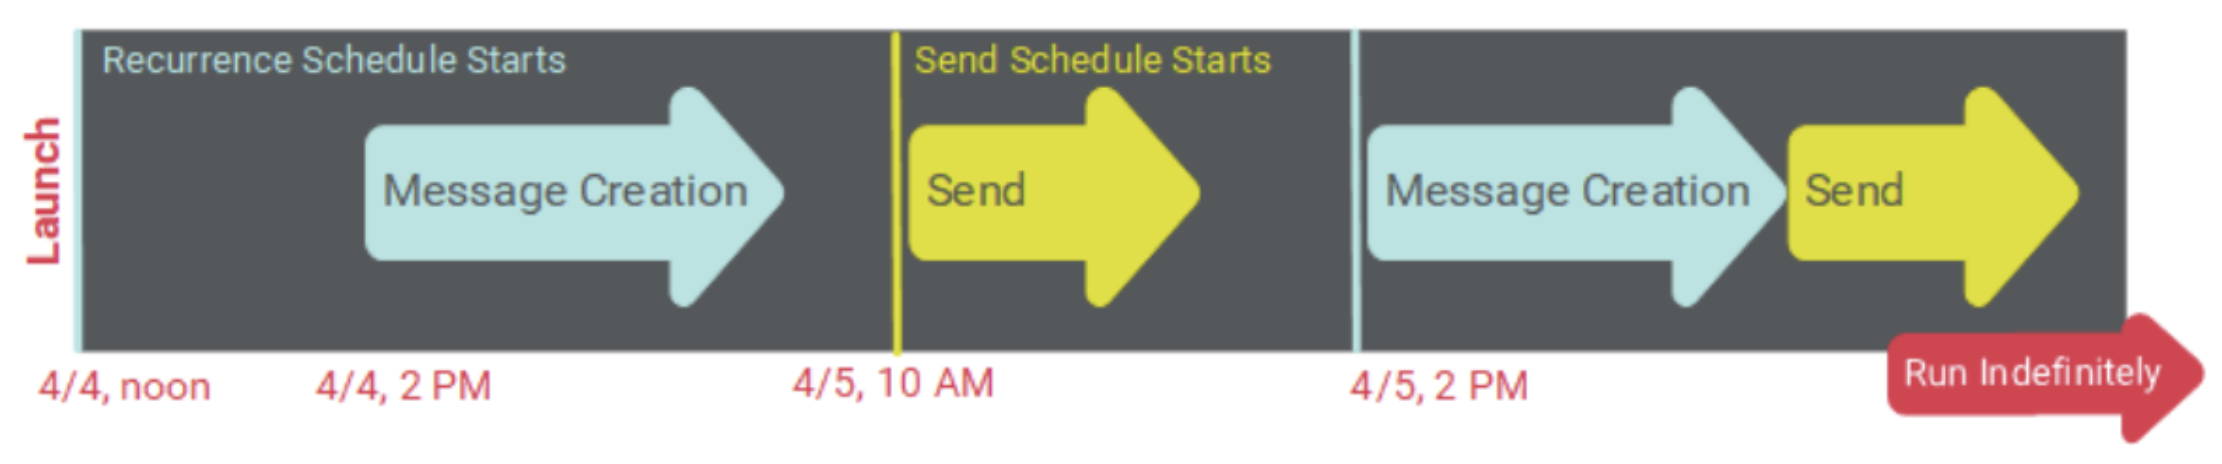
In this example, the Campaign was launched at noon on April 4. The first execution of the message creation process occurred a few hours later at 2:00 PM, according to the Recurrence Schedule Frequency. However, these messages weren't actually sent yet because the Send Schedule wasn't live. These messages were held in the queue.
The following day at 10:00 AM, the Send Schedule went live. At that moment, the system sent all messages currently in the queue. In this case, that included all the messages that were built the previous day.
After that initial deployment, the Recurrence Schedule Frequency controlled all subsequent processing -- the message building phase began every day at 2:00 PM, and those messages were deployed immediately afterward. In this scenario, you can see how you can define a send time that is unique only to the first deployment.
Sending window
By default, the platform will send messages "all day long," until all of the messages currently in the queue have been sent. Optionally, you can define a daily Sending Window, which sets a begin time and end time. The platform will send messages only during this Sending Window. If the Campaign doesn't complete the sending process during the Sending Window, the remaining recipients will stay queued until the next window.
The Sending Window options are displayed within the Advanced Options panel.
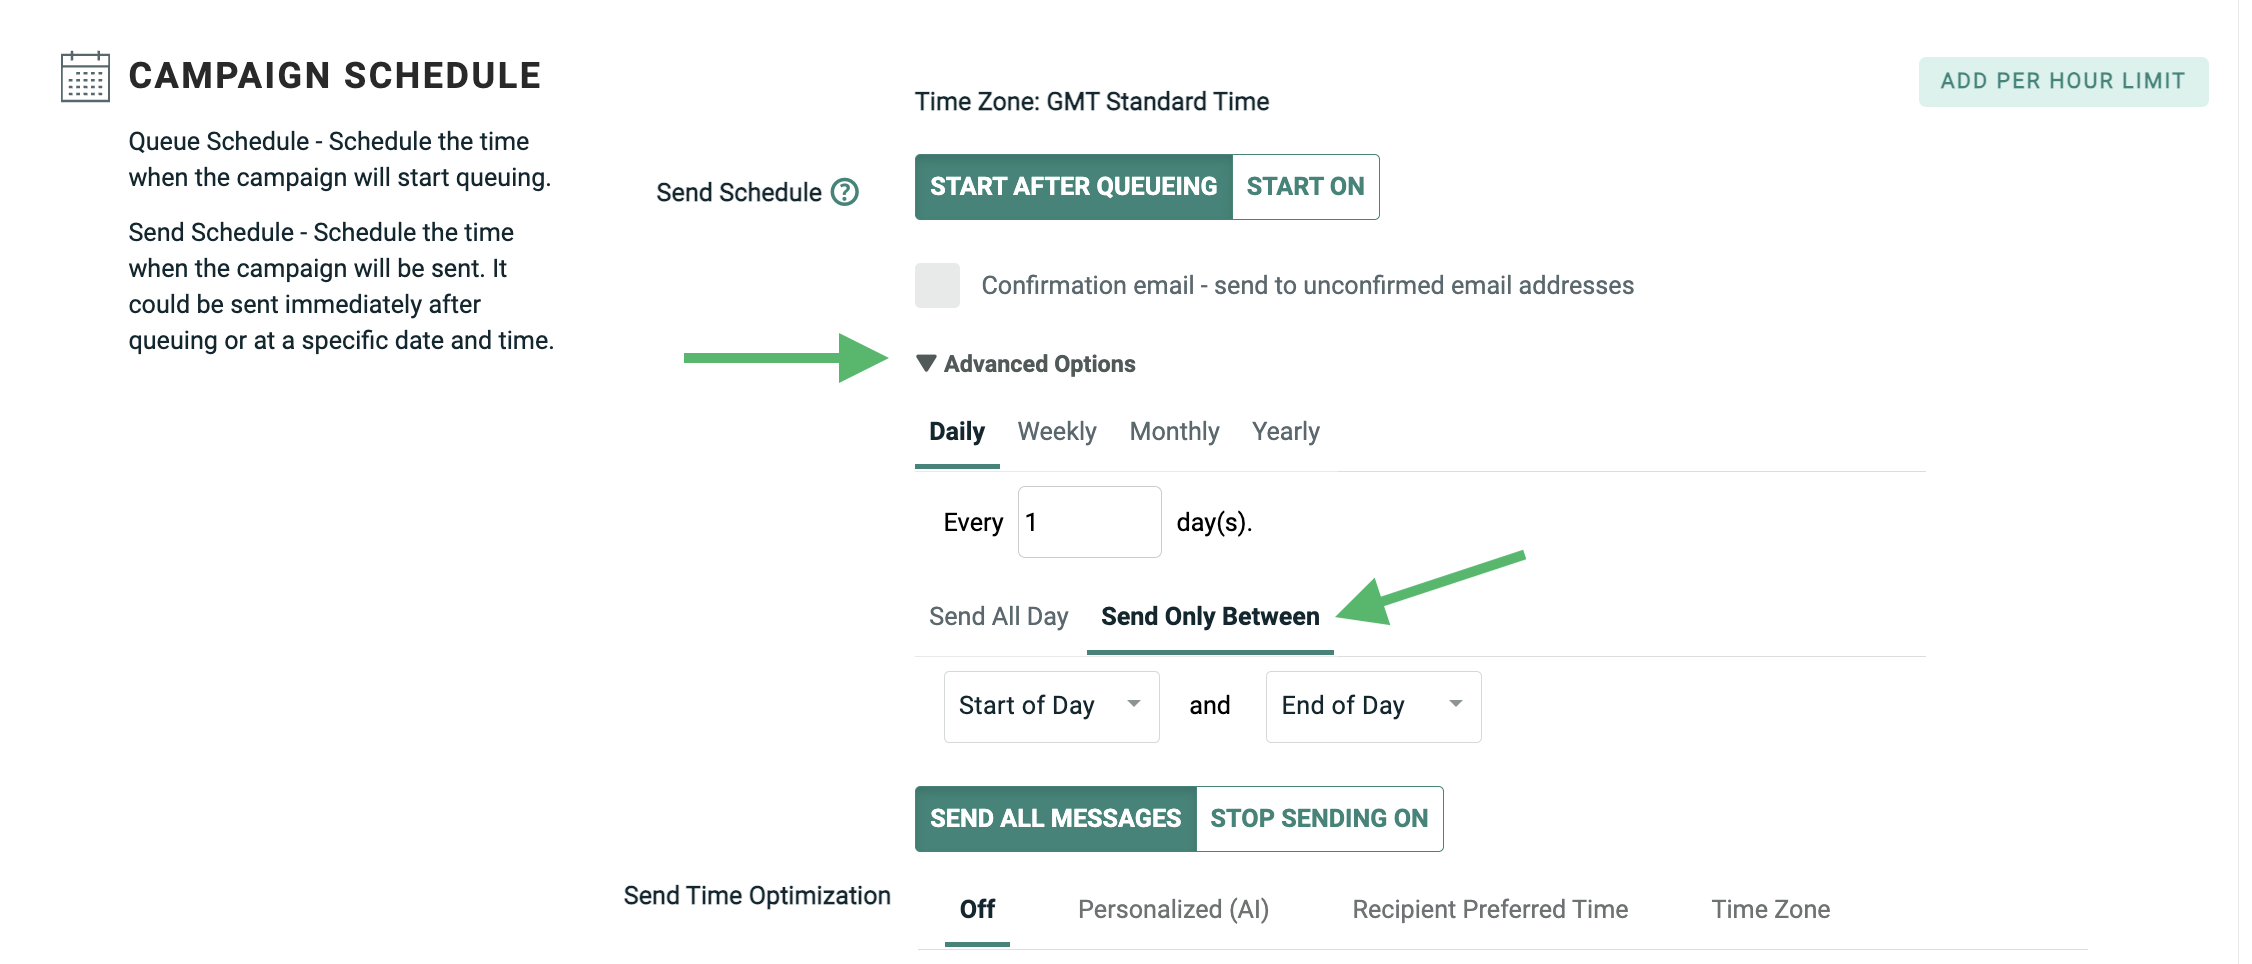
Note:The Daily / Weekly / Monthly / Yearly tabs shown above in the "Advanced Options" section are used to define a "sending frequency." However, these options aren't relevant to a Date-triggered Campaign, which sends messages based on the Recurrence Frequency.
The following diagram depicts the use of a Sending Window. In this scenario, the Recurrence Schedule and the Send Schedule were both set to "Immediately." However, the client wanted to send messages only between 12:00 PM and 5:00 PM.
The Campaign was launched on April 1 at 2:00 PM, with the default Recurrence Schedule Frequency (once daily, every day, at 9:00 AM).
The message building phase began the following day at 9:00 AM according to the Recurrence Schedule Frequency. Typically, these messages would be sent immediately after they're built, but because the user set up a Sending Window, the messages were instead held in the queue until the next available Sending Window.
Later that day at 12:00 PM, the Sending Window began, and the system started sending the messages in the queue. At 5:00 PM when the Sending Window ended, any messages still in the queue were held over until the next Sending Window the following day.
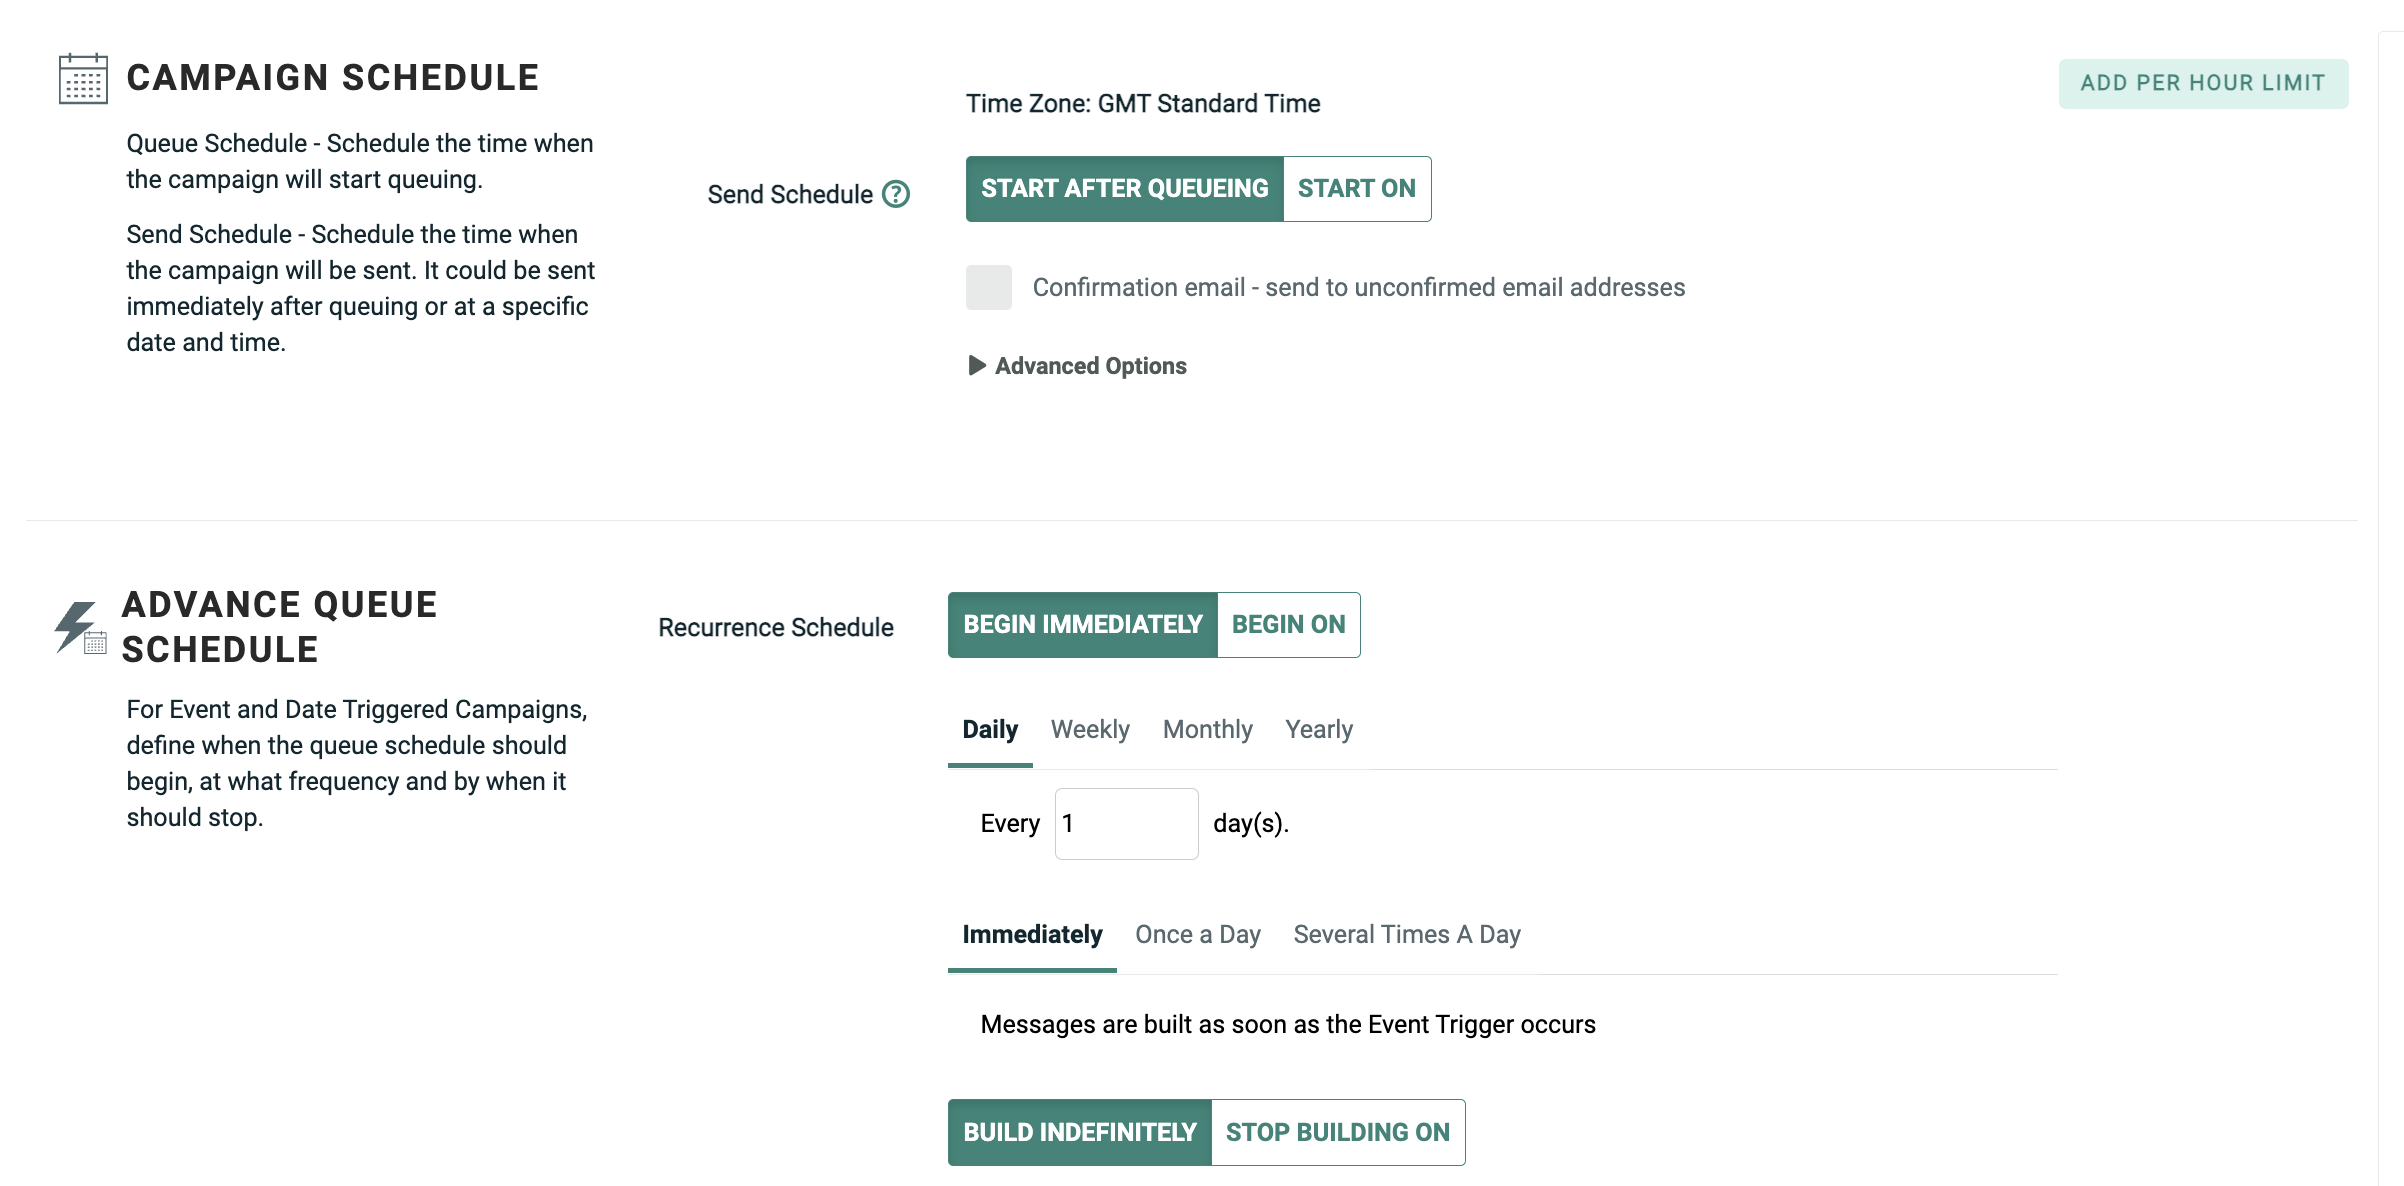
Event-triggered Campaigns
Schedule options
As described above, a Campaign goes through two separate and distinct phases when it's launched: building messages and sending messages. For an Event-triggered Campaign, the Audience of recipients is calculated based on who performs the triggering event.
For example, if your Event-triggered Campaign uses "Web Form Submission" as the trigger, then the Audience consists of the individual(s) who submitted the desired Web Form. The schedule then controls when, and how often, the system will actually build and send messages to the recipients in the Audience.
The schedule for an Event-triggered Campaign contains the following components:
-
Queue Schedule Start: This component controls when you want the Queue Schedule to be active, or to go "live." You can either select "Immediately," meaning the Queue Schedule will go live immediately after the Campaign is launched, or you can set a start date / time in the future. You can also optionally set an end date / time for the Queue Schedule, or let the schedule run indefinitely (until the Campaign is stopped or cancelled).
-
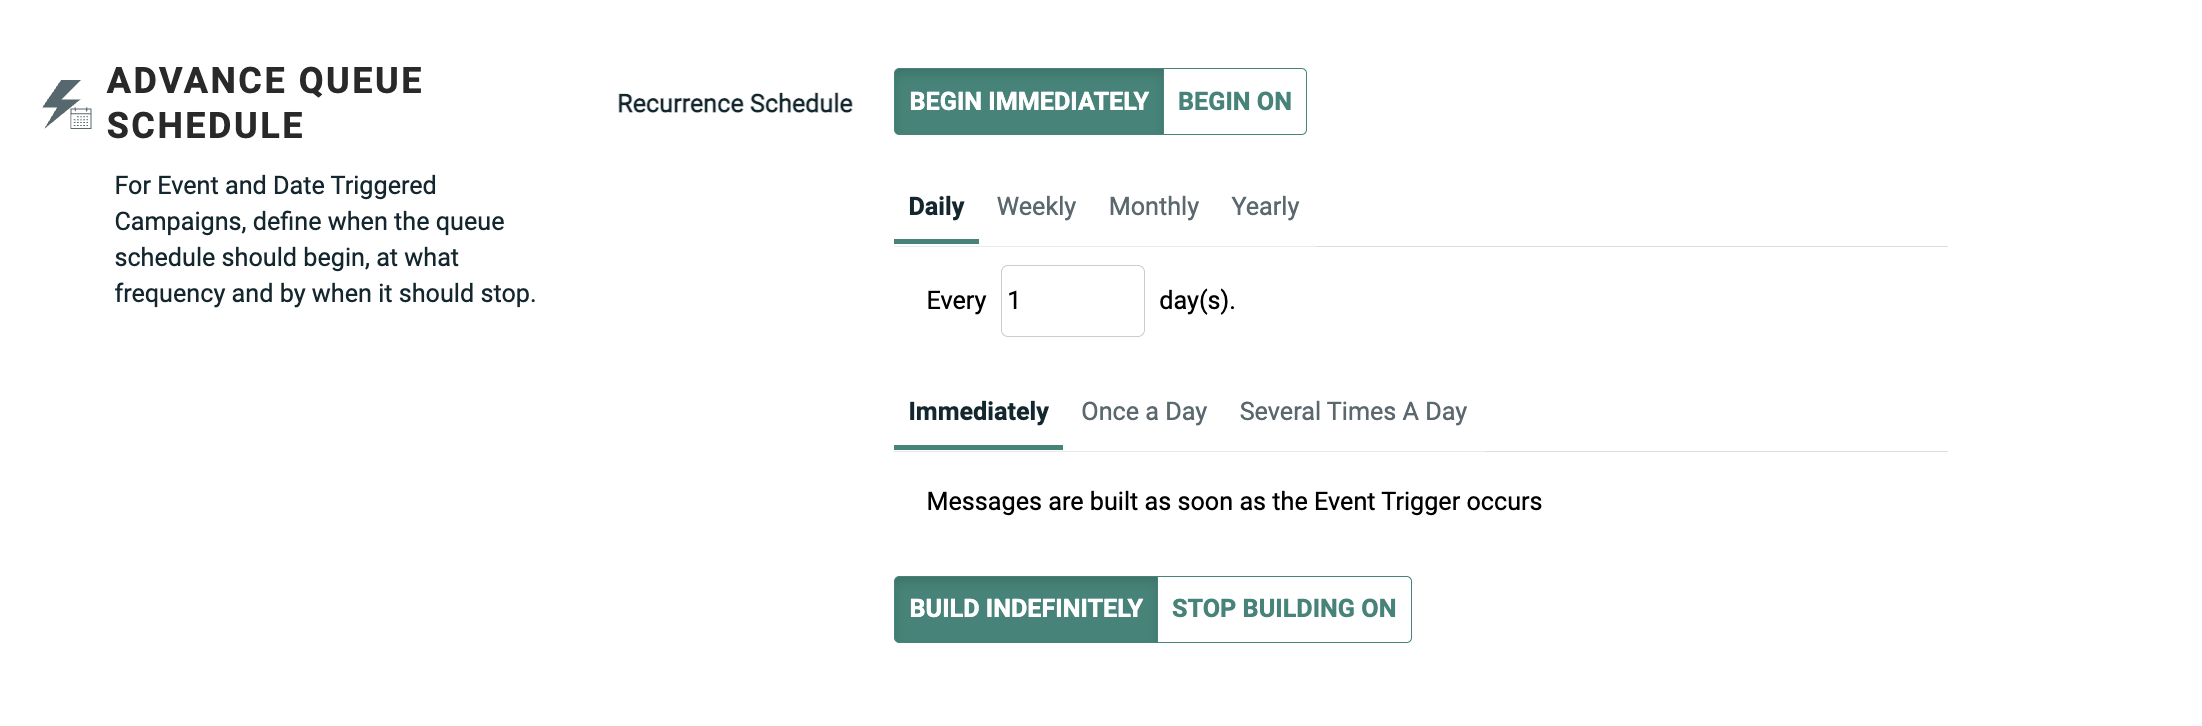
Queue Frequency: Once the Queue Schedule is "live," this component controls when, and how often, the platform builds messages based on new trigger occurrences. This frequency can be set to run "immediately" (meaning, immediately after the triggering event happens), or the frequency can be set using a daily, weekly, monthly, or yearly interval. Also, the frequency can be set to run once a day at a specified time, or to run multiple times a day, with the optional use of a Building Window.
-
Building Window: This component allows you to define a limited time range, or "window," during which time the platform will build messages. If the Campaign doesn't complete the building process during the Building Window, the remaining messages will get built during the next window.
-
Sending Window: Once the Send Schedule is "live," this component allows you to define a limited time range, or "window," during which time the platform will send messages. If the Campaign doesn't complete the sending process during the Sending Window, the remaining recipients will stay queued until the next window.
The schedule options are displayed within the Review chevron of the Enhanced Workflow Campaign screen.
Examples
This section contains a variety of examples, in order to illustrate the different Campaign scheduling options for an Event-triggered Campaign.
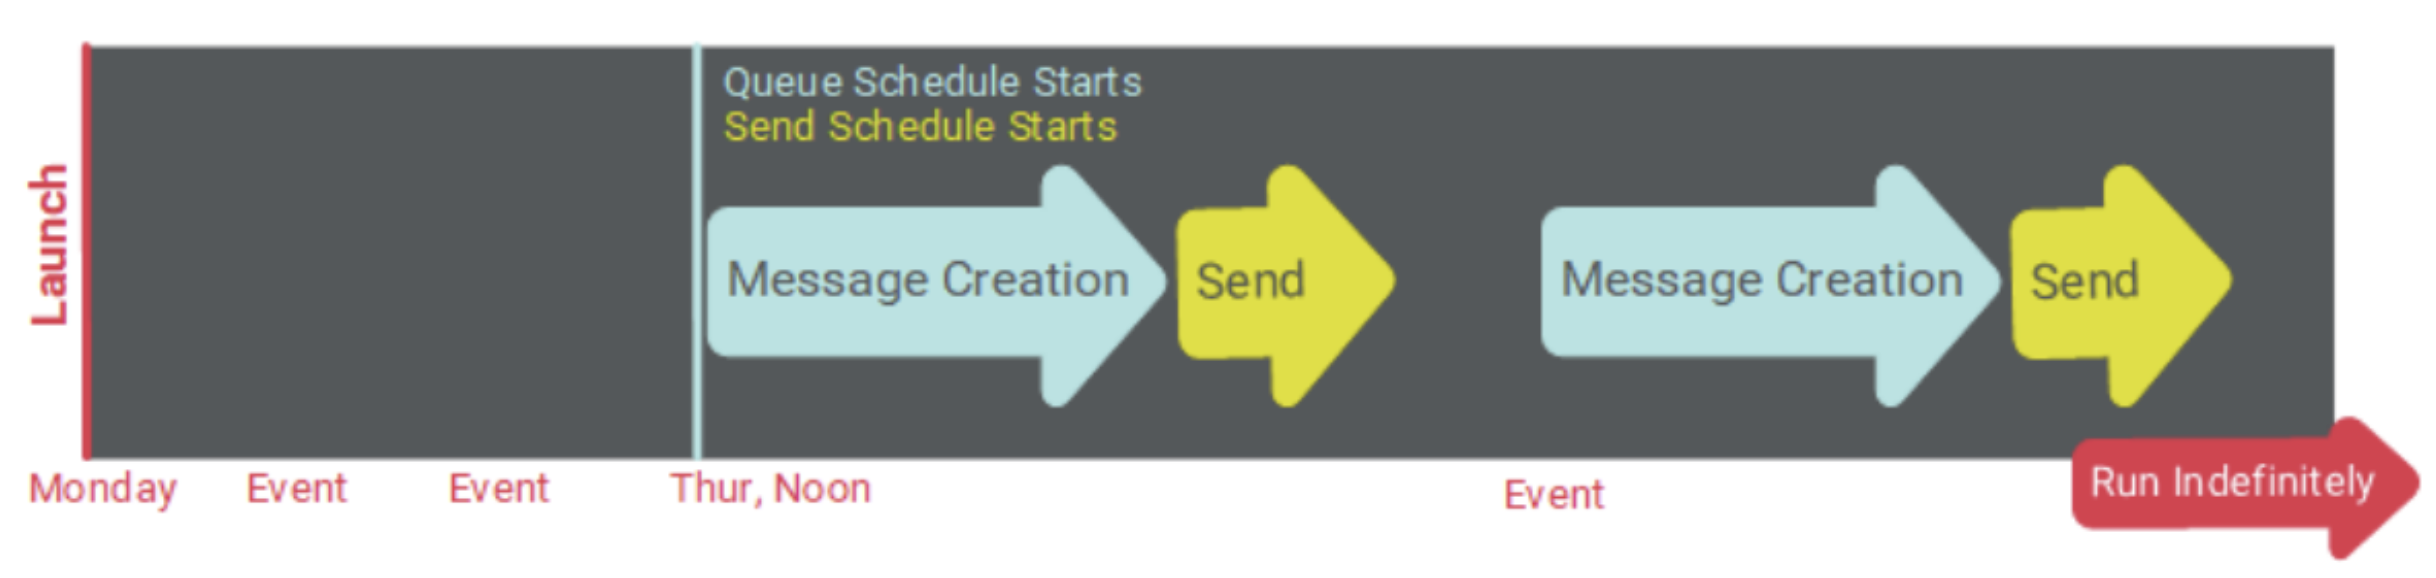
Default schedule
The default schedule settings for an Event-triggered Campaign (depicted above) are to start both the Queue Schedule and the Send Schedule immediately upon launching the Campaign, to use a Queue Frequency of "immediately when the event occurs" (without the use of a Building Window), and to send messages "every day, all day long," without the use of a Sending Window.
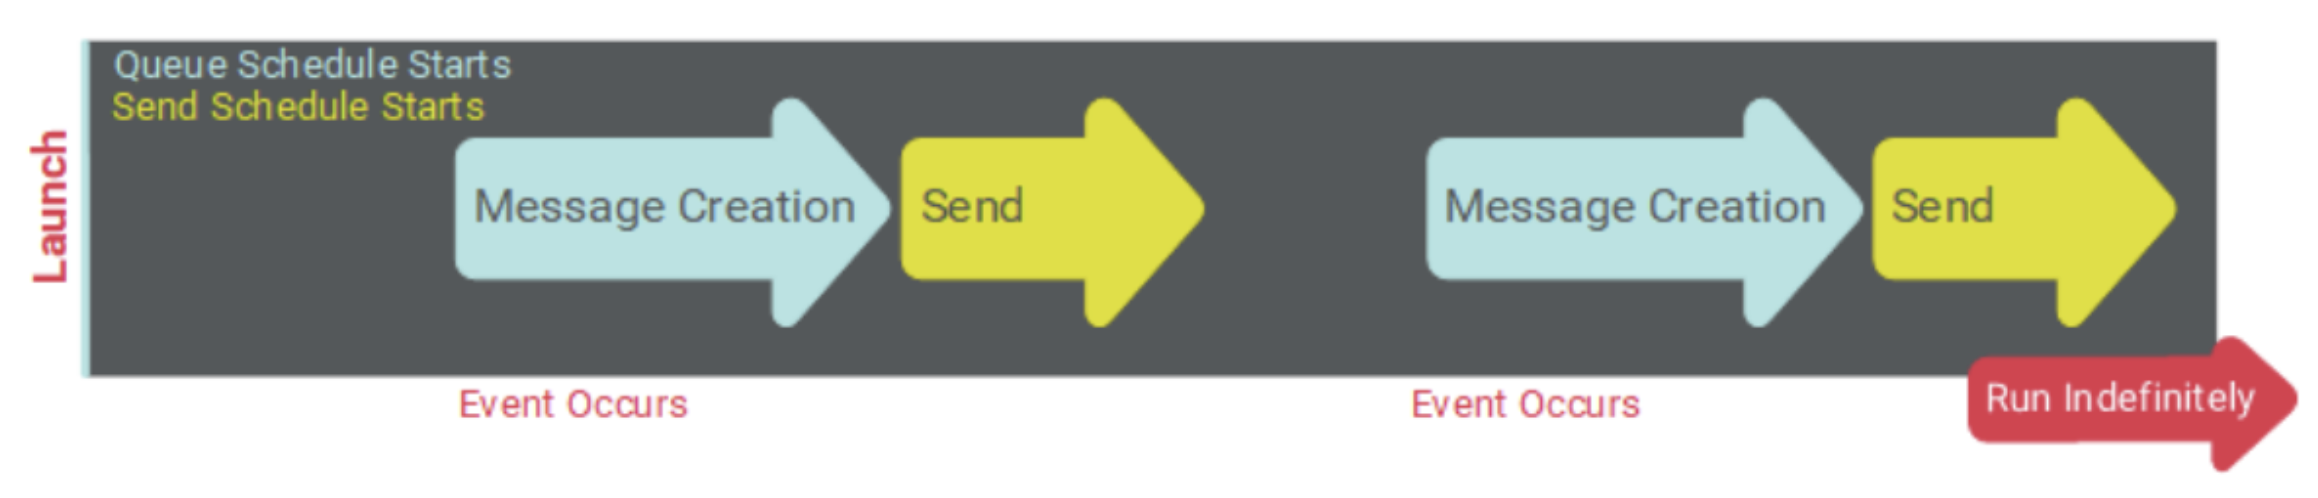
The following diagram depicts the default schedule scenario for an Event-triggered Campaign.
Custom queue frequency
Optionally, you can define a custom Queue Frequency to execute the message build phase only at a specified frequency. This frequency can be defined based on a daily, weekly, monthly, or yearly interval.
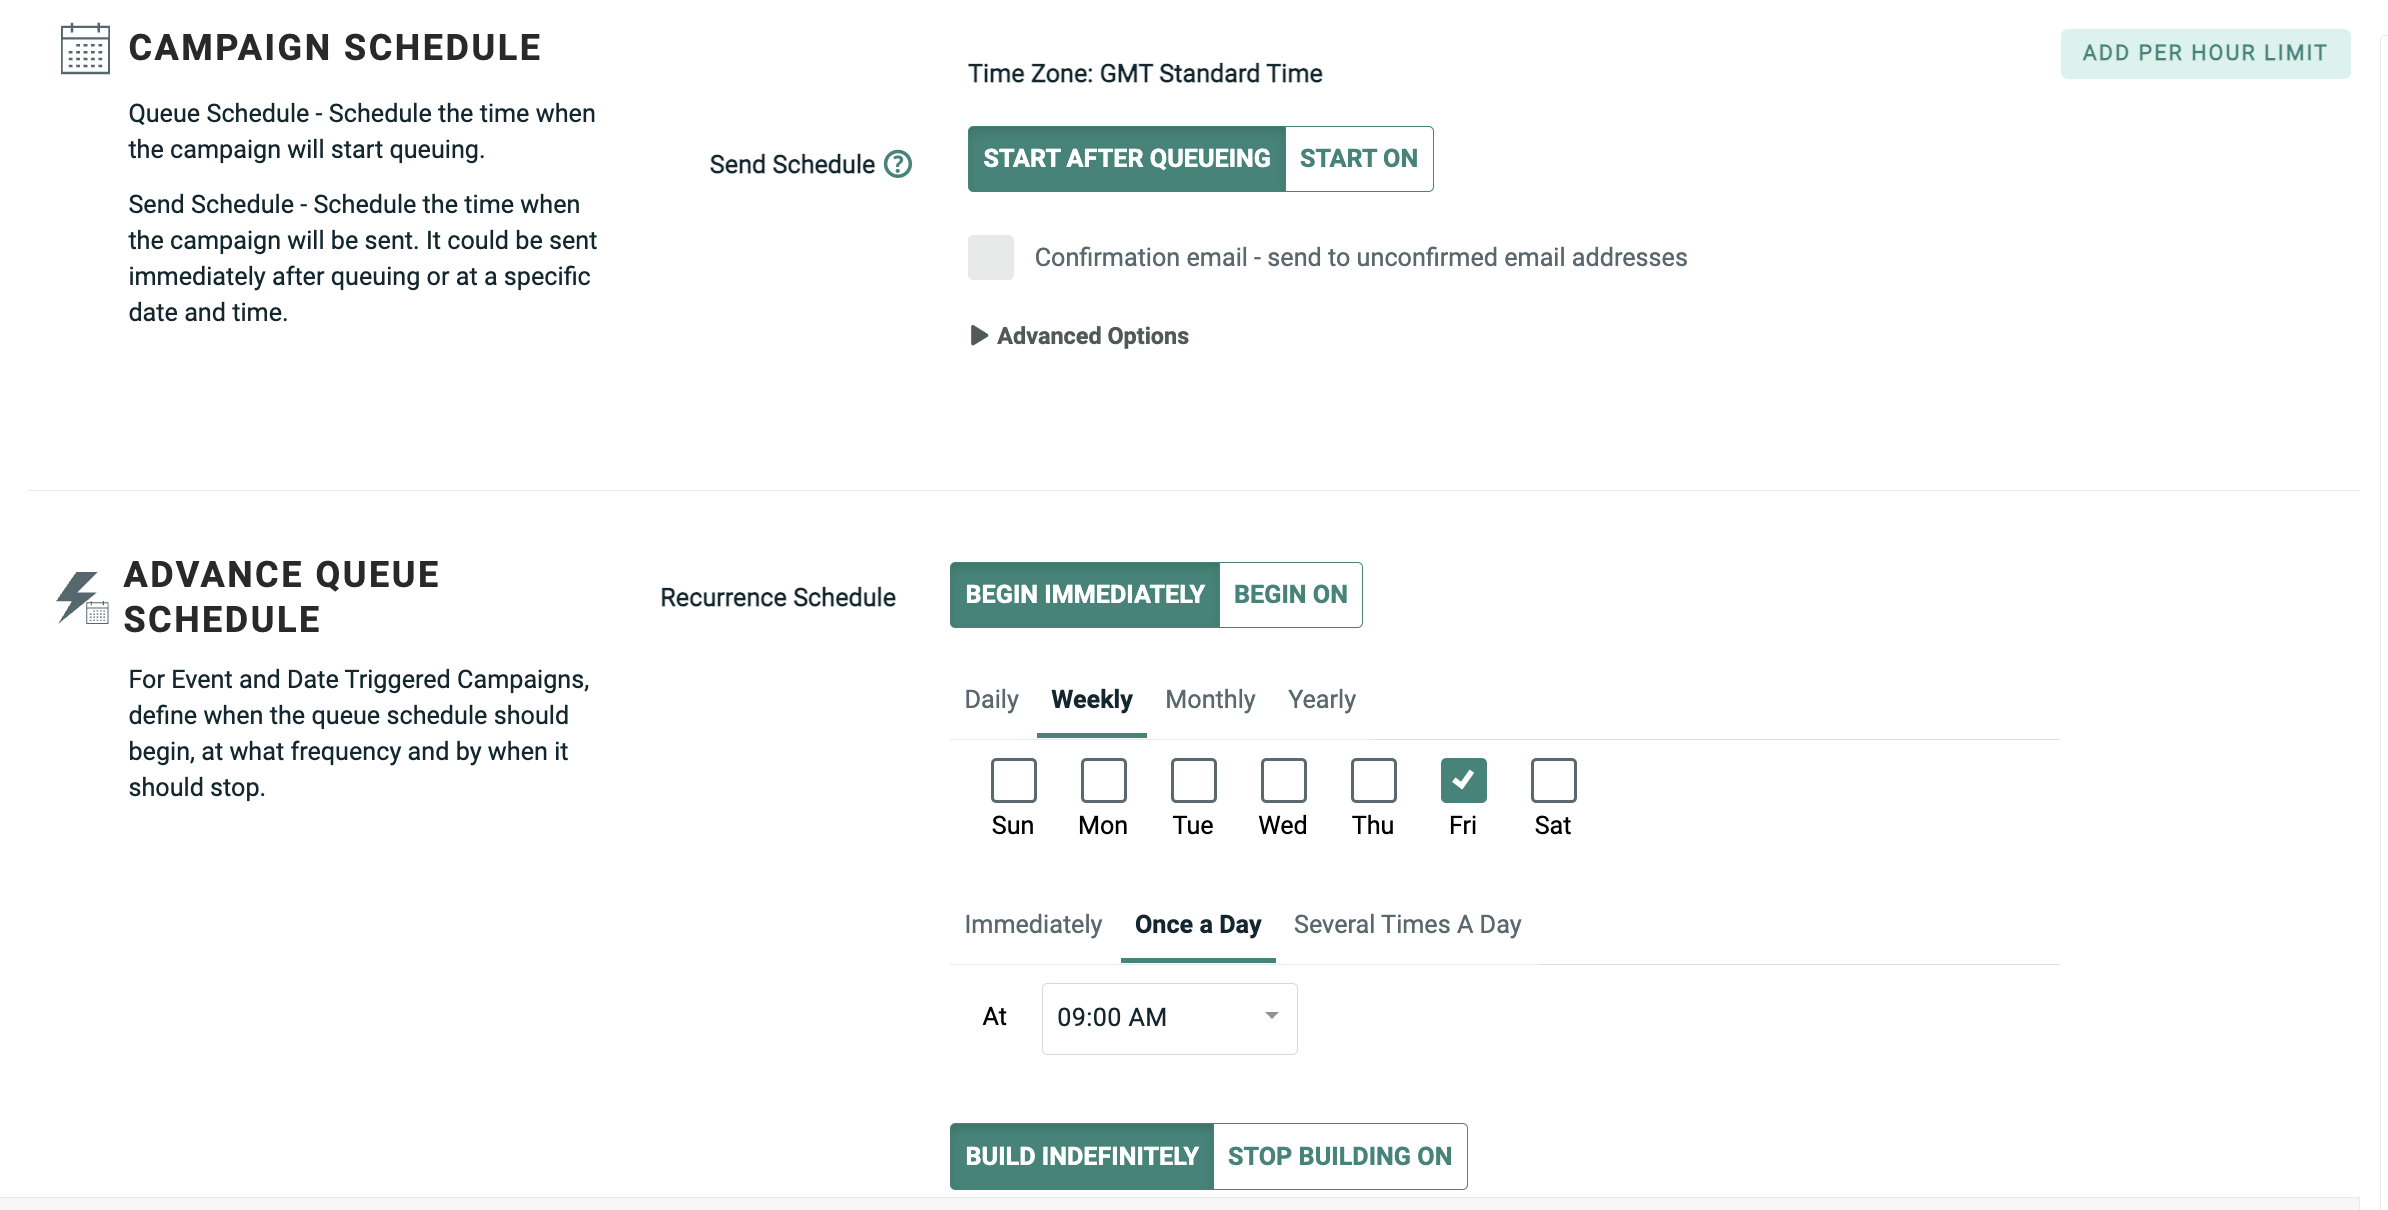
The following diagram depicts an Event-triggered Campaign that uses an immediate start for both the Queue and Send Schedules. The Queue Frequency is set to "Weekly, Fridays, at 8:00 AM." The system will "batch up" all of the event occurrences all week long, then create and send all of the messages starting on Friday at 8:00 PM.
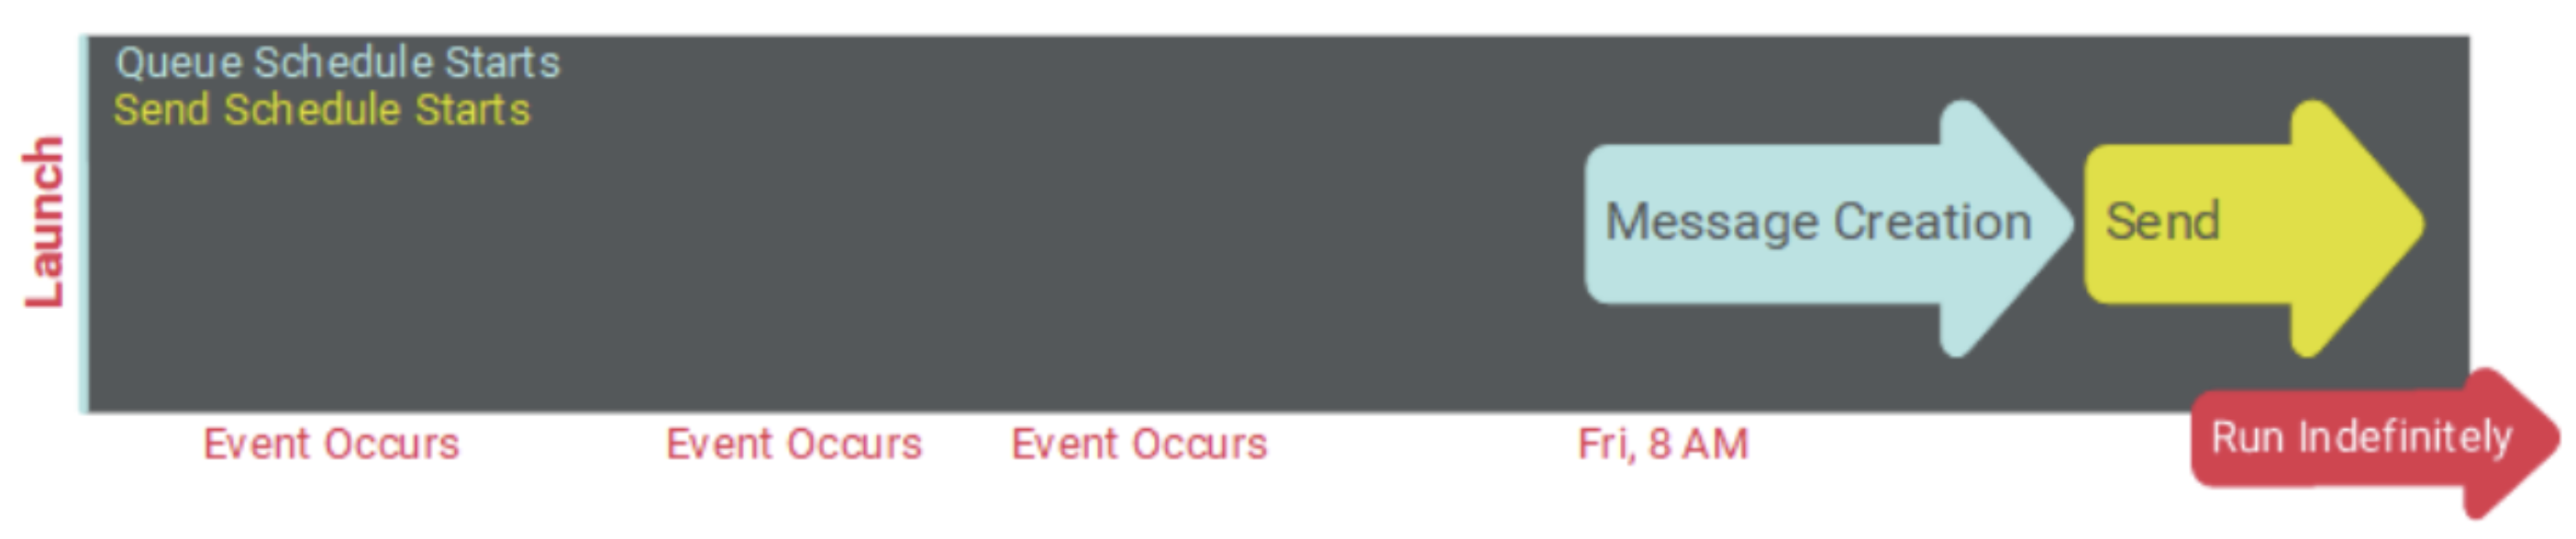
Note:If using Advanced Event Trigger (AET) as the Campaign trigger type, the platform works differently than other trigger types. AET is designed as a near-real-time message solution, and will always send the message as quickly as possible. The system will not "batch up" AET occurrences; instead, the platform will override the delayed schedule start, and build and send the message immediately.
Delay both scheduled starts
Optionally, you can delay the Queue Schedule and the Send Schedule by setting start dates / times for both. In this scenario, the system won't do anything if a triggering event occurs, until the start dates / times are reached, and the schedules go "live." Please note that the Send Schedule start date / time must either be the same as, or after, the Queue Schedule start date / time.
The following diagram depicts an Event-triggered Campaign with delayed Queue and Send Schedules. In this example, both schedules were set to start on Thursday at noon. The Queue Frequency was set to ""immediately when the event occurs," with a Send Frequency of "every day, all day long" (without the use of a Sending Window). The Campaign was then launched on Monday. No messages were created or deployed until the Queue and Send Schedules went "live" on Thursday. All subsequent executions were controlled by the Queue Frequency and sending options.
Sending window
By default, the platform will send messages all day long, immediately after they're built. Optionally, you can define a daily Sending Window, which sets a begin time and end time. The platform will send messages only during this Sending Window. If a trigger event occurs outside of the Sending Window, the platform will hold the message in the queue until the next Sending Window.
The Sending Window options are displayed within the Advanced Options panel.
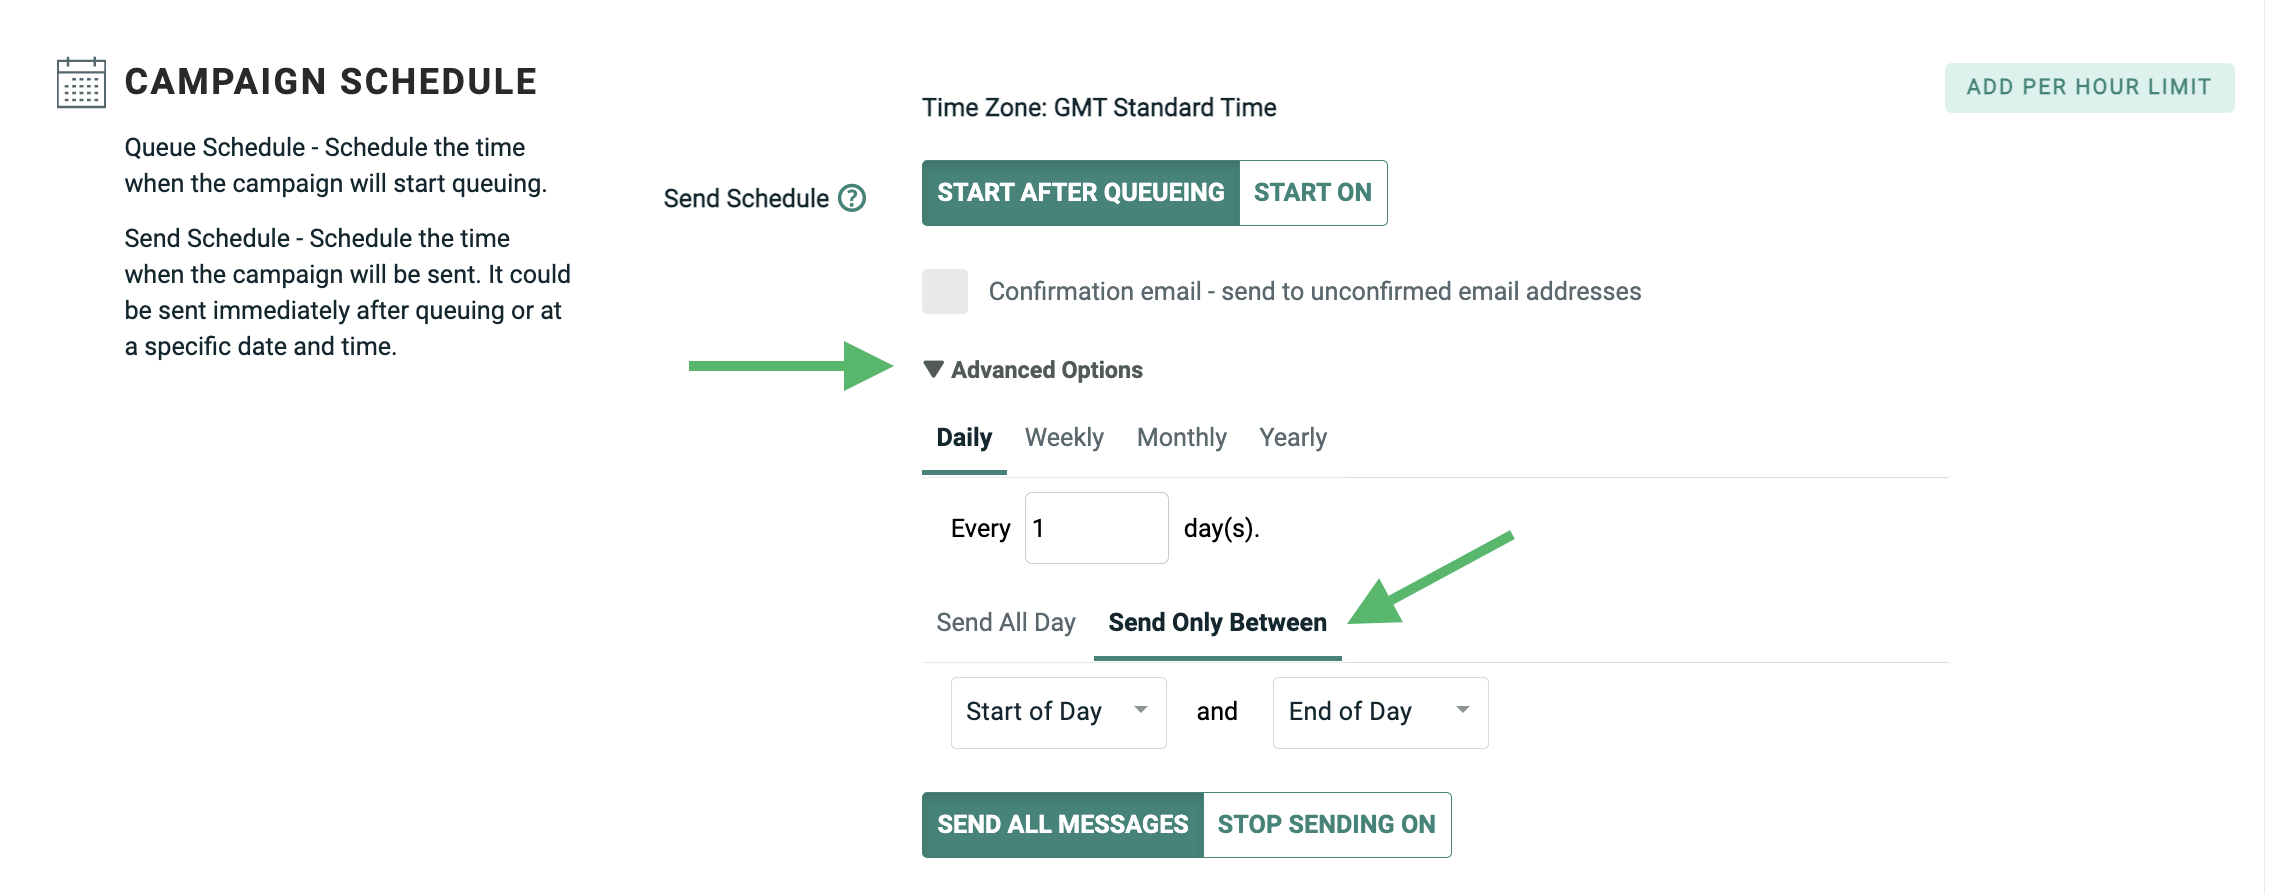
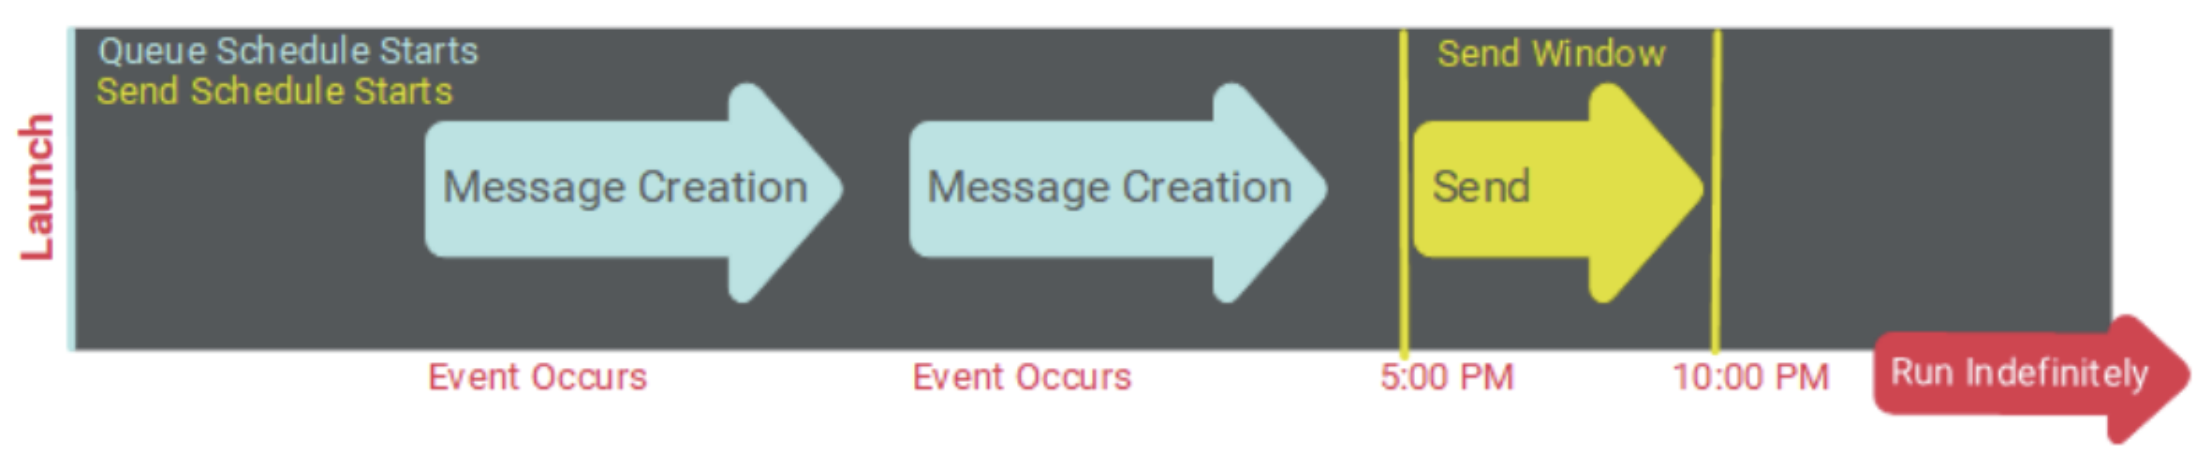
The following diagram depicts the use of a Sending Window. In this scenario, the Queue Frequency was configured to build messages every day, as soon as the triggering event occurred. However, the client wanted to send messages only between 5:00 PM and 10:00 PM.
Engagement data platform
Cheetah Digital supports two different data sources for building Email Campaigns -- the Messaging database and the Engagement Data Platform (EDP).
The Engagement Data Platform is the data layer that powers and unifies the different applications within Cheetah Digital's Customer Engagement Suite. When using EDP as the data source, Cheetah Digital allows you to create Regular One-off and Date-triggered Email Campaigns; you can't create Event-triggered Campaigns, nor can you create Campaigns in channels other than Email.
Campaigns that use EDP as the data source utilize a different flow than Campaigns that use a Messaging table as the data source. Because of this different flow, the schedule options are slightly different, as described below.
Regular one-off Campaigns
The concept of an Advance Queue (that is, queueing email messages up for some period of time prior to deployment) is not supported in EDP-driven Regular One-off Campaigns. Therefore, you can't define separate Queue and Send Schedules, as you can for Campaigns built off a Messaging table. Instead, you must define a single Send Schedule, which encompasses both phases.
The schedule for an EDP-driven Regular One-off Campaign comprises the following component:
-
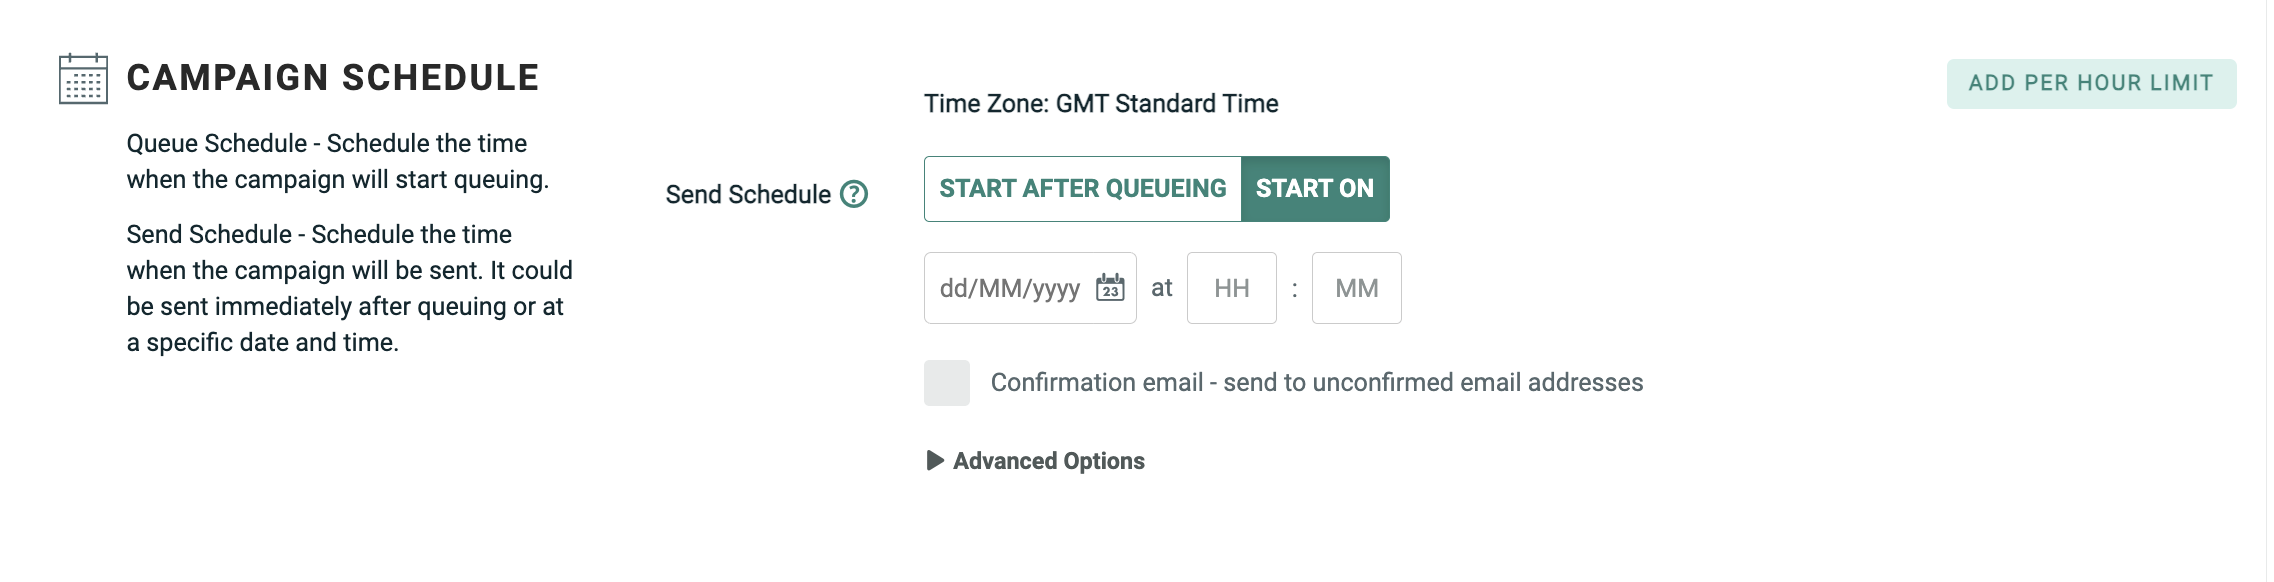
Send Schedule Start: This component controls when you want the message building and sending phases to begin. You can either select "Immediately," meaning the Send Schedule will go live immediately after the Campaign is launched, or you can set a start date / time in the future. The Campaign will continue sending messages until they've all been sent, at which time the Campaign is considered "Done."
Date-triggered Campaigns
The concept of an Advance Queue (that is, queueing email messages up for some period of time prior to deployment) is not supported in EDP-driven Date-triggered Campaigns. Therefore, you can't define separate schedules for the message building phase and for the message sending phase, as you can for Campaigns built off a Messaging table. Instead, you must define a single Recurrence Schedule and Recurrence Frequency, which encompasses both phases.
The schedule for an EDP-driven Date-triggered Campaign comprises the following components:
-
Recurrence Schedule Start: This component controls when you want the Recurrence Schedule to be active, or to go "live." You can either select "Immediately," meaning the Recurrence Schedule will go live immediately after the Campaign is launched, or you can set a start date / time in the future. You can also optionally set an end date / time for the Recurrence Schedule, or let the schedule run indefinitely (until the Campaign is stopped or cancelled).
-
Recurrence Schedule Frequency: Once the Recurrence Schedule is active, this component controls when, and how often, the Campaign will build and send new messages.
-
Recurrence Schedule Window: This optional component allows you to define a limited time range, or "window," during which time the platform will build and send messages. If the Campaign doesn't complete the process during the Recurrence Schedule Window, the remaining messages will get built and sent during the next window.
Send time optimization
Send Time Optimization (STO) allows you to derive the best time to contact each recipient within the Campaign's audience. The platform will deploy messages to each recipient based on their preferred time of day.
STO supports the following scenarios:
-
Email channel only
-
The Campaign uses a Messaging table as its data source; STO is not supported in Campaigns that use the Engagement Data Platform (EDP) as the data source.
-
Regular One-off and Date-triggered Campaigns only; STO is not supported for Event-triggered Campaigns.
Advanced scheduling options (Sending Window, Stop Sending date / time, Per Hour Send Limit) can be used in conjunction with STO. If the STO-calculated send time falls outside of a specified delivery window, the platform will send the message at the nearest time within that allowed timeframe.
STO is used in conjunction with the Queue Schedule / Send Schedule options. If the STO process is unable to identify a preferred sending time for a recipient, or if STO is unsupported for a recipient (for example, the recipient does not live in the U.S.), the platform will revert back to using the Send Schedule defined for the Campaign.
STO options
Messaging supports several STO configuration options, which are described below.
Machine learning recommended time
Machine Learning (ML) Recommended Time utilizes machine learning models based on click and open data to determine the optimal delivery time based on recipient behavior and email engagement.
When you select ML Recommended Time, you must pick the recipient action on which you want to base the Send Time Optimization - Opens, Clicks, or Reads.
Recipient preferred time
Recipient Preferred Time utilizes either a recipient's local time (as determined by Postal Code) or a preferred delivery time to optimize Campaign delivery.
The Recipient Postal Code option uses a postal code field to optimize Campaign deployment based on each recipient's local time. When using this option, you must pick the Postal Code field you want to use.
The Recipient Preferred Time option lets you optimize Campaign deployment based on data imported into the platform from a third-party source. When using this option, you must select the field in the Messaging table that contains the preferred time data. Optionally, you can use the Recipient Preferred Time feature in conjunction with a Postal Code field.
Time zone
The Time Zone option lets you optimize Campaign deployment based on each recipient's local time zone. To use this feature, the Campaign's source table must have a dedicated Time Zone field that stores the time zone value for each recipient.
Note: This option is available for Regular One-off Campaigns only.
When using this option, you must pick the Time Zone field you want to use.
